Lets Learn ExpressJS
Getting Started with ExpressJS

👋 Hi, I'm Mohd Ahsan Raza Khan! I know you might be thinking my name is quite long, right? Don't worry, you can call me MARK. I'm a software developer with a passion for building web applications and sharing knowledge through writing. I love exploring new technologies and frameworks, and I'm particularly interested in JavaScript, ReactJS, NodeJS, ExpressJS, and MongoDB. In my free time, I enjoy learning about new technologies and writing tutorials to help others learn and grow in their coding journey. I'm always excited to connect with fellow developers, so feel free to reach out to me on LinkedIn. Let's build something amazing together!
What is ExpressJS?
Express.js is a lightweight and flexible web application framework for Node.js, providing powerful features for building web servers and APIs with ease and efficiency.
Resolving Node.js Challenges
Express.js addresses several common challenges faced by developers when building web applications with Node.js:
Complexity in Route Handling: With vanilla Node.js, developers often create separate cases for each route, leading to bloated and repetitive code.
Divergent HTTP Method Handling: HTTP methods like GET, POST, PUT, and DELETE are often handled differently for each route, resulting in code inconsistency.
Dependency on External Modules: Parsing query parameters, handling headers, and working with JSON data require separate modules like 'url', creating additional dependencies and complexity.
Manual Setup and Configuration: Developers often find themselves implementing everything from scratch, resulting in verbose and error-prone code.
Tedious HTTP Code Writing: Writing HTTP code directly in Node.js can be cumbersome and aesthetically unpleasing, leading to maintenance challenges.
Express.js simplifies web development in Node.js by providing a lightweight and flexible framework that abstracts away many of these complexities. With Express, developers can define routes more intuitively, handle HTTP methods consistently, and leverage built-in middleware for common tasks like parsing requests and handling JSON data. This streamlined approach results in cleaner, more maintainable code, making web development in Node.js more efficient and enjoyable.
Installation of ExpressJs
To install Express.js in your Node.js project, you can use npm (Node Package Manager), which is typically bundled with Node.js. Here's how you can install Express.js:
Open your terminal or command prompt.
Navigate to your project directory, if you're not already there.
Run the following command to install Express.js as a dependency in your project:
npm install express
This command will download the latest version of Express.js and add it to your project's node_modules folder, as well as update your package.json file with the dependency information.
Now, you can start using Express.js in your Node.js project by requiring it in your code files:
const express = require('express');
Basic Routing
Routing refers to determining how an application responds to a client request to a particular endpoint, which is a URI (or path) and a specific HTTP request method (GET, POST, and so on) read starter.
Each route can have one or more handler functions, which are executed when the route is matched.
Route Structure:
app.METHOD(PATH, HANDLER)
Where:
appis an instance ofexpress.METHODis an HTTP request method, in lowercase.PATHis a path on the server.HANDLERis the function executed when the route is matched.
Note: Basic Routing is referred to in the Express Starter. You should go and read it there.
First code in ExpressJS
// Import the Express module
const express = require('express');

// Create an instance of Express
const app = express();

// Define a route handler for the root path
app.get('/', (req, res) => {
    res.send('Hello, Express!');
});

// Define a route handler for the /about path
app.get('/about', (req, res) => {
    // "Hello Guest" is shown in the browser if no query is given;
    // otherwise, the username is displayed.
    // Query URL: http://localhost:3000/about?name=Mark
    const name = req.query.name || 'Guest';
    res.send(`Hello ${name}`);
});

// Start the server and listen on post 3000
app.listen(3000, () => {
    console.log('Server is running on http://localhost:3000')
});
How Versioning Work in NodeJS
In the dynamic world of Node.js development, understanding versioning is key to managing dependencies effectively. Let's break down how it works:
Version Structure:
Node.js versions follow a structured format: <Major>.<Minor>.<Patch>
Major Release: Represents significant updates or breaking changes. Incrementing this number signals major shifts in functionality.
Minor Release: Introduces new features or enhancements without breaking existing functionality.
Patch Release: Addresses bugs, security vulnerabilities, or minor improvements without introducing new features.
Semantic Versioning:
Semantic versioning (SemVer) is a widely adopted convention for versioning Node.js packages. It uses symbols like caret (^), tilde (~), and exact version numbers to define compatibility and update behavior:
^version: Compatible with the specified version, but allows for minor and patch updates. For example,^4.18.2implies compatibility with versions up to, but not including,5.0.0.~version: Approximately equivalent to the specified version, allowing only for patch updates. For instance,~4.18.1restricts updates to versions before4.19.0.version: Must match the exact version specified. For precise control over dependencies, use this format.
You can also refer to the documentation on npmjs for more detailed information about specifying version ranges.
Choosing Specific Versions:
When installing packages, you can specify the desired version using npm install:
npm install express@4.17.2
Best Practices:
Regularly review release notes and changelogs to understand the impact of updates on your project.
Before upgrading, assess whether the changes benefit your project and ensure compatibility with existing code.
Stay informed about issues reported in the latest version to anticipate potential challenges.
Conclusion:
Understanding versioning in Node.js empowers developers to manage dependencies effectively, ensuring stability and compatibility across projects. By following best practices and leveraging SemVer conventions, you can navigate the dynamic landscape of Node.js development with confidence.
What is RESTful API
A RESTful API, or Representational State Transfer, operates on the basis of a client-server architecture. It adheres to specific rules, promoting best practices for interaction.
Key Principles:
Client-Server Model: Emphasizes the separation of concerns between the client and the server, enabling each to evolve independently.
Respect for HTTP Methods: HTTP methods, such as GET, POST, PUT, PATCH, and DELETE, are utilized appropriately:
GET /user: Retrieve and return user data.POST /user: Handle the creation of a new user.PATCH /user: Update user information.
Avoid methods like POST /updateUser, POST /createUser, or POST /deleteUser, as they violate the standard practice.
By following these guidelines, developers can design RESTful APIs that are efficient, scalable, and adhere to industry standards.
Building RESTful APIs using Node.js and Express.js
In this project, we'll create a simple RESTful API using Node.js and Express.js to manage user data.
Project Setup:
Create a folder called Project-01.
Run a command in your terminal:
npm init -ywill simply generate an empty npm project and create thepackage.jsonfile.Create an
index.jsfile as the entry point.Install Express.js using
npm i express.
Designing RESTful API:
GET /users: Render an HTML document listing all users.
GET /api/users: Return a JSON array of all users.
GET /api/users/:id: Retrieve a specific user by ID.
POST /api/users: Create a new user.
PATCH /api/users/:id: Update an existing user.
DELETE /api/users/:id: Delete a user by ID.
We need hard-coded data from mockaroo.com. which generates fake data for test purposes.
const express = require('express');
const users = require('./MOCK_DATA.json');
const app = express();
const PORT = 8000;

// Routes
app.get('/users', (req, res) => {
  const html = `
  <ul>
    ${users.map((user) => `<li>${user.first_name}</li>`).join('')}
  </ul>`
  res.send(html);
})

// RESTful APIs:
// GET Method
app.get('/api/users', (req, res) => {
  return res.json(users);
});

// GET Method with Dynamic Path Parameters :dynamicPathVariable
app.get('/api/users/:id', (req, res) => {
  const id = Number(req.params.id);
  const user = users.find(user => user.id === id);
  return res.json(user);
});

// POST Method
app.post('/api/users', (req, res) => {
  // TODO: Create New User
  return res.json({status: "pending"});
});

// PATCH Method
app.patch('/api/users/:id', (req, res) => {
  // TODO: Edit the ser with id
  return res.json({status: "pending"});
});

// Delete Method
app.delete('/api/users/:id', (req, res) => {
  // TODO: Delete the ser with id
  return res.json({status: "pending"});
});

app.listen(PORT, () => {
  console.log('Server started at http://localhost:8000')
});
GET, PATCH, and DELETE methods use the same path. We can also write this code in a different way.
app.route('/api/users/:id')
  .get((req, res) => {
    const id = Number(req.params.id);
    const user = users.find(user => user.id === id);
    return res.json(user);
  })
  .patch((req, res) => {
    // TODO: Edit the user with ID
    return res.json({ status: "pending" });
  })
  .delete((req, res) => {
    // TODO: Delete the user with ID
    return res.json({ status: "pending" });
  });
Introduction to Postman for REST API
Browser-based tools like Chrome or Firefox are limited in their ability to send requests like POST, PATCH, and DELETE. This is where Postman comes in handy.
Downloading Postman
Start by downloading Postman from their official website.
What is Postman?
Postman is an API platform designed for developers, enabling efficient API testing, documentation, design, building, testing, and iteration processes.
Getting Started
Open Postman: Launch the Postman application.

Start your server: Run a command in your terminal
npm start.When using
npm start, the scriptnode indexis executed. However, a disadvantage of this approach is that you have to manually re-run the script every time you make changes to the code, which can be quite tedious. To address this issue, we can use Nodemon, a utility that automatically restarts the Node.js application when file changes are detected.To install Nodemon as a development dependency, use the command
npm install --save-dev nodemon. Then, update thestartscript in thepackage.jsonfile tonodemon index. This change ensures that Nodemon is used to run the application, enabling automatic restarts whenever code changes are made.To install Nodemon globally, run the
npm install -g nodemonornpm install --global nodemoncommand on your system. It'll be installed on your system path, enabling you to use the "nodemon" command directly.Sending a Request:
URL:
http://localhost:8000/usersRequest: [
GET]http://localhost:8000/users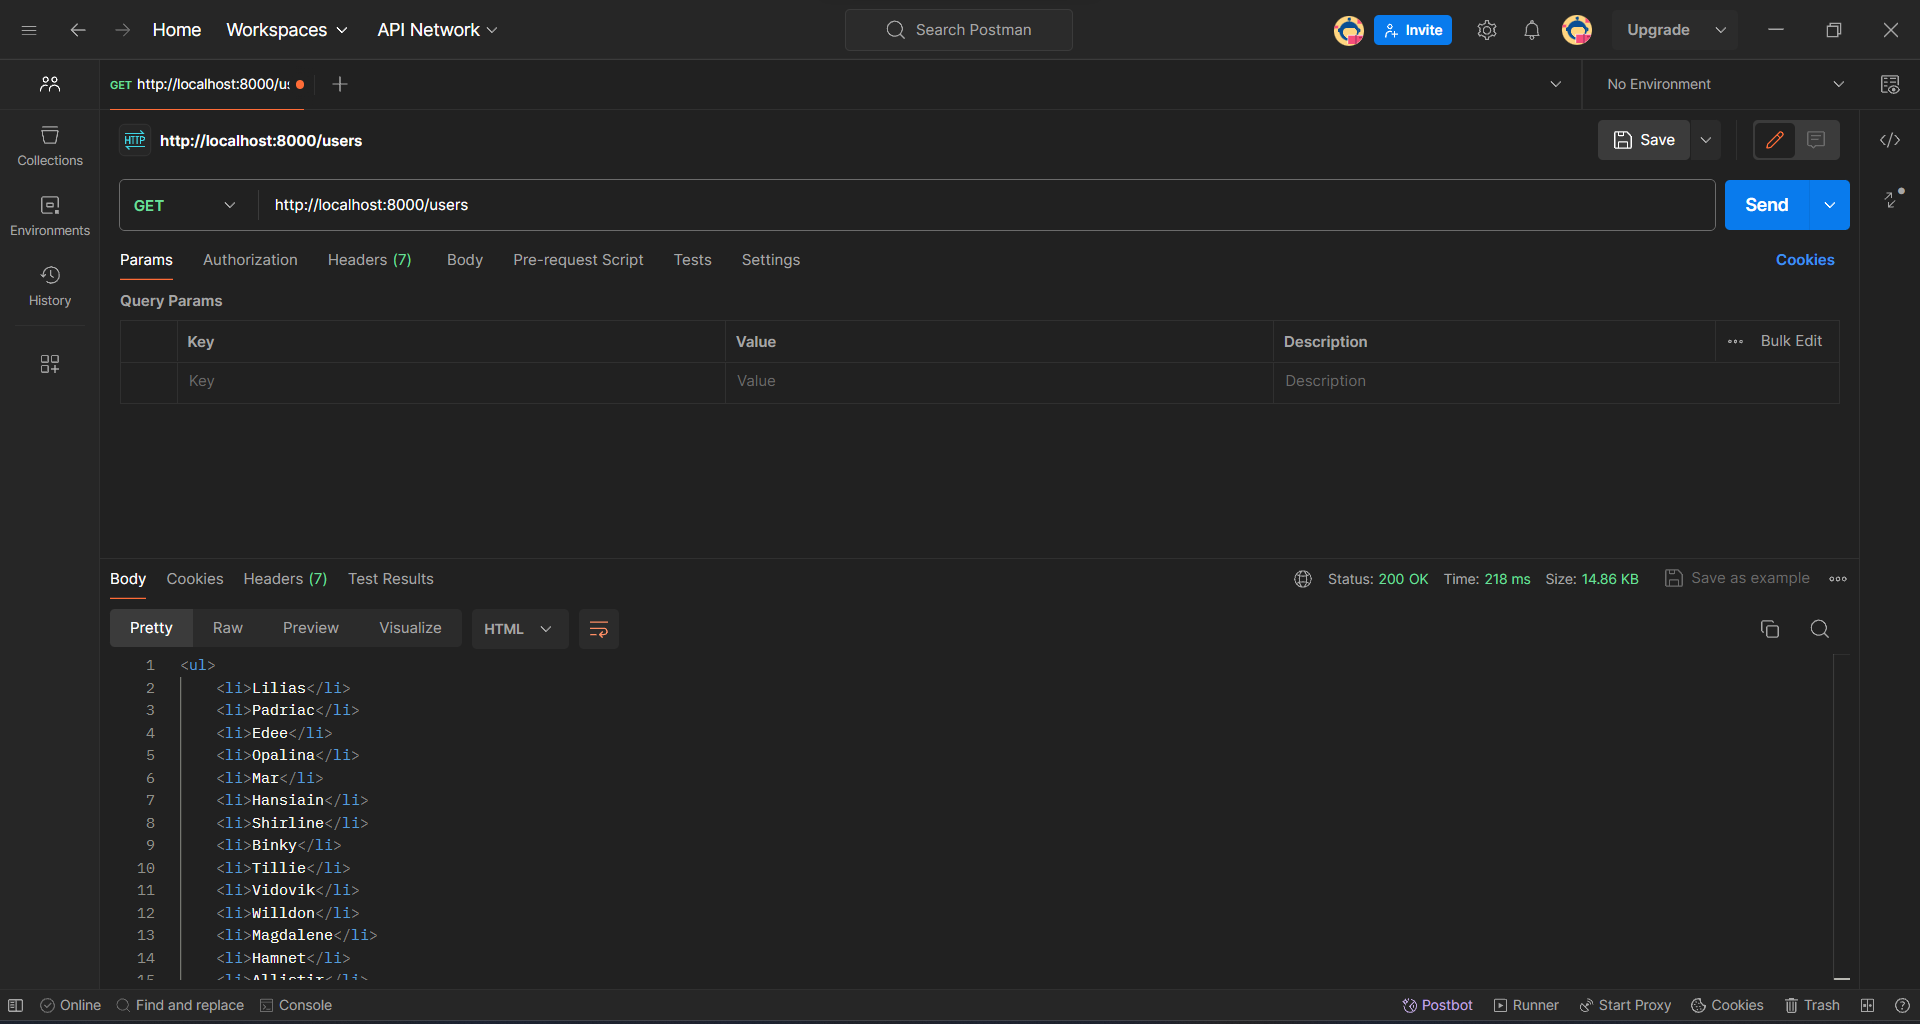
Status: 200 OK (Standard response for successful HTTP requests)
Time: 218ms (Time taken to complete this request)
Size: 14.86KB
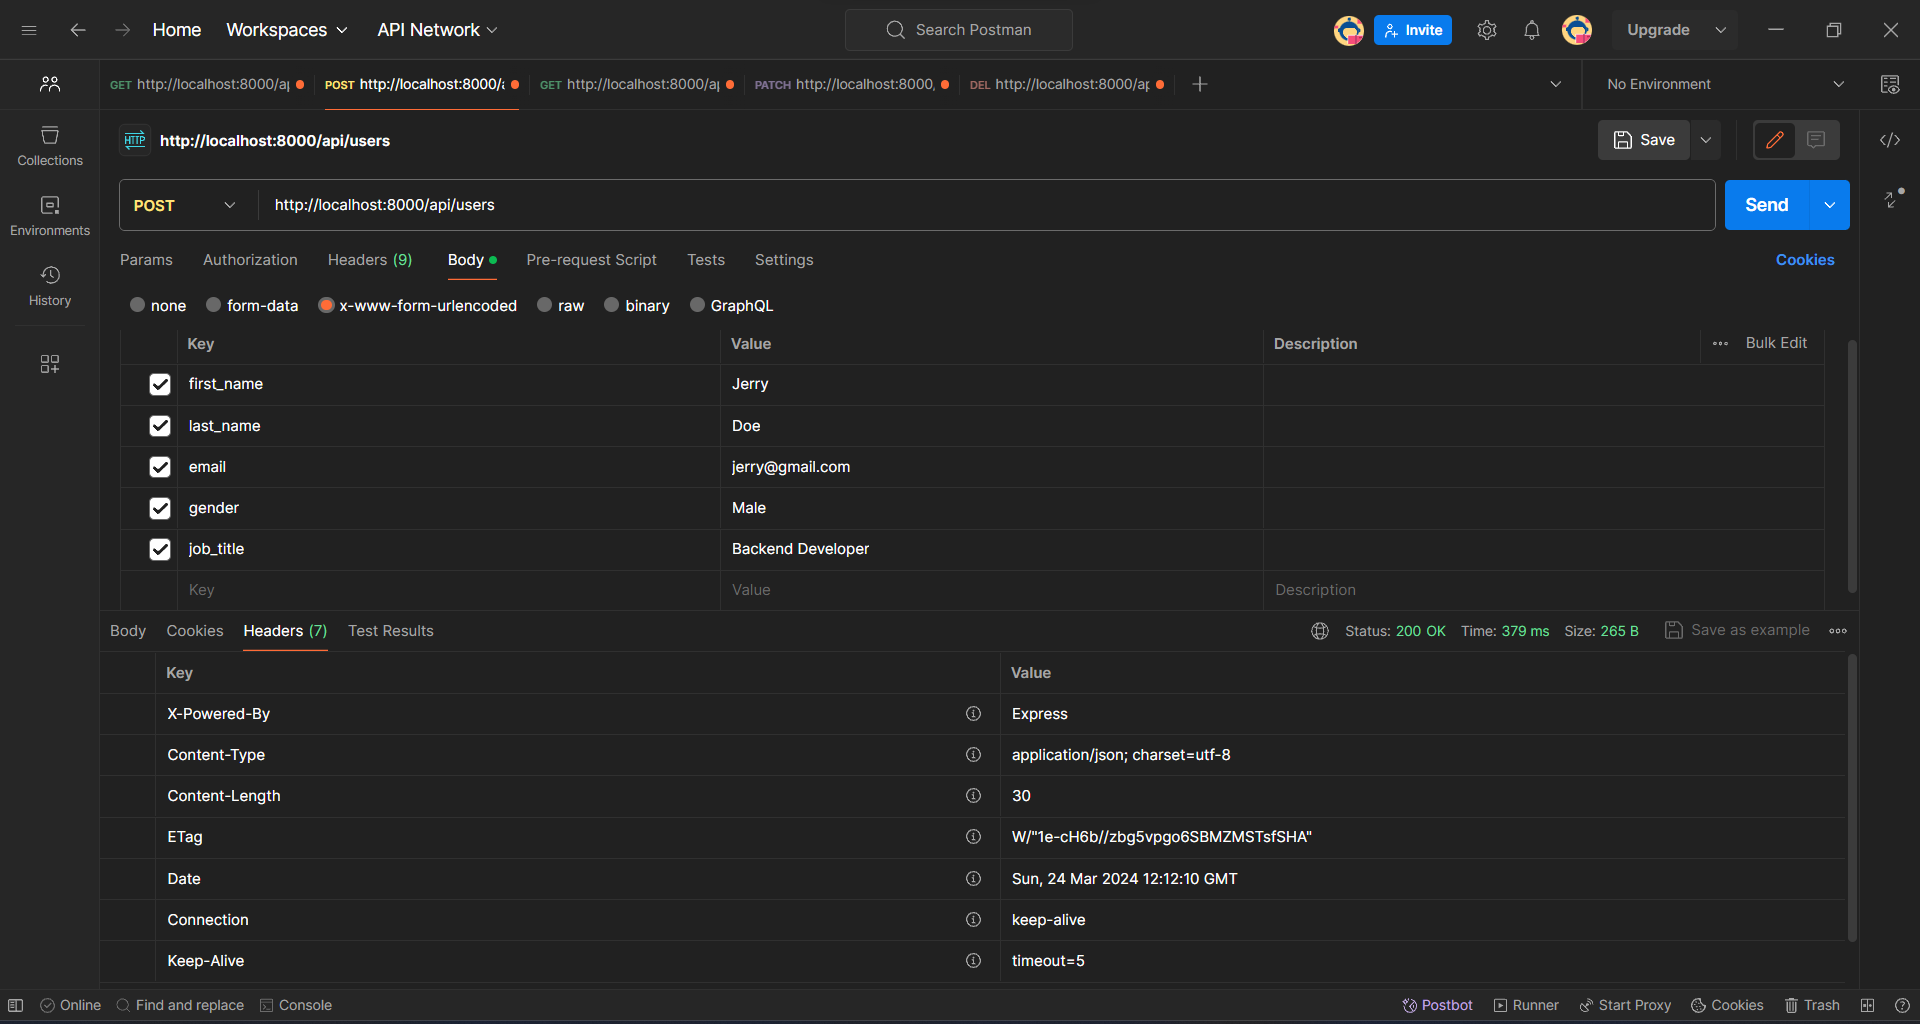
Handling POST Requests and Storing Data in Express
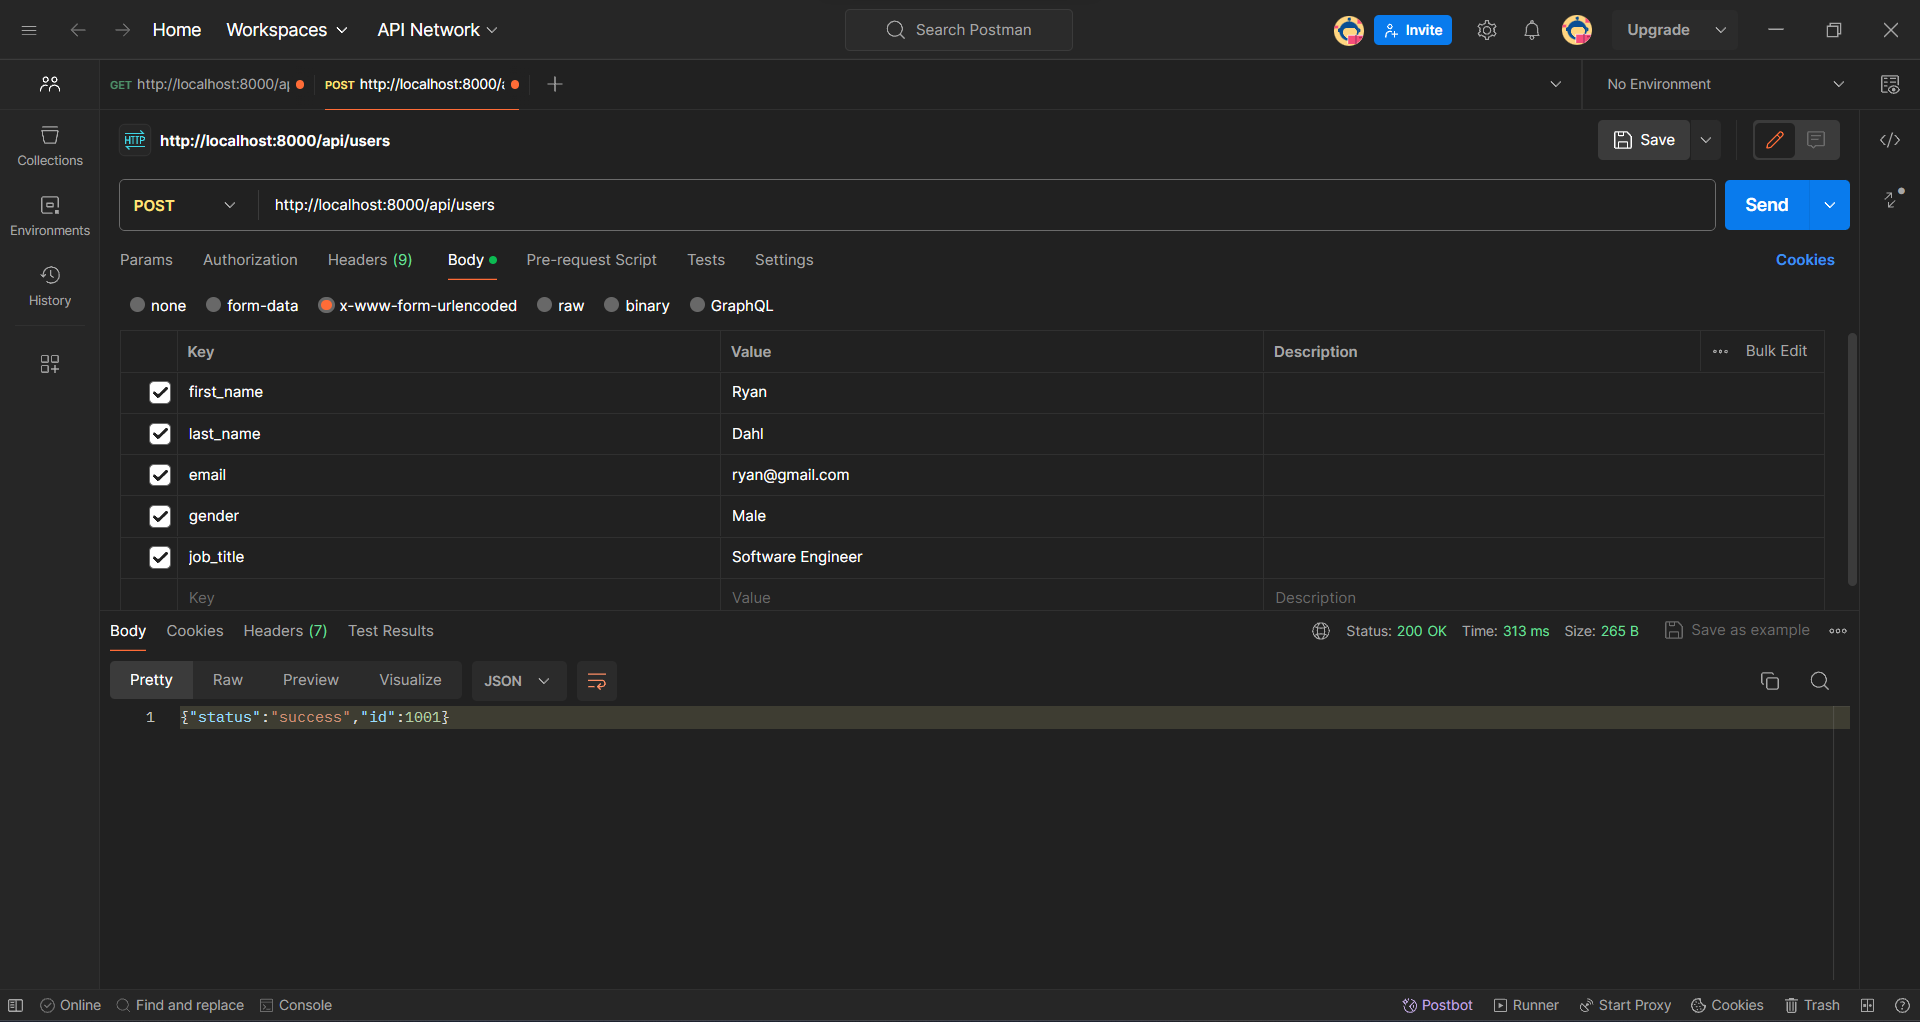
When dealing with POST requests in Express, we need to parse the incoming request body to access the data sent from the client. We can achieve this using middleware provided by Express, such as
express.urlencoded()orexpress.json().// Middleware to parse incoming request bodies app.use(express.urlencoded({ extended: false }));This middleware parses incoming requests with
application/x-www-form-urlencodeddata and populatesreq.bodywith the parsed data.Once we've parsed the request body, we can access the data in our route handlers. For example, to handle a POST request to create a new user:
  app.post('/api/users', (req, res) => {
    const body = req.body; // Access the parsed request body
    // Add the new user data to the existing users array
    users.push({ ...body, id: users.length + 1 });
    // Write the updated data to the JSON file
    fs.writeFile('/MOCK_DATA.json', JSON.stringify(users), (err, data) => {
      if (err) {
        return res.status(500).json({ error: 'Failed to write data to file' });
      }
      return res.json({ status: 'success', id: users.length });
    });
  });
In this example, we extract the user data from
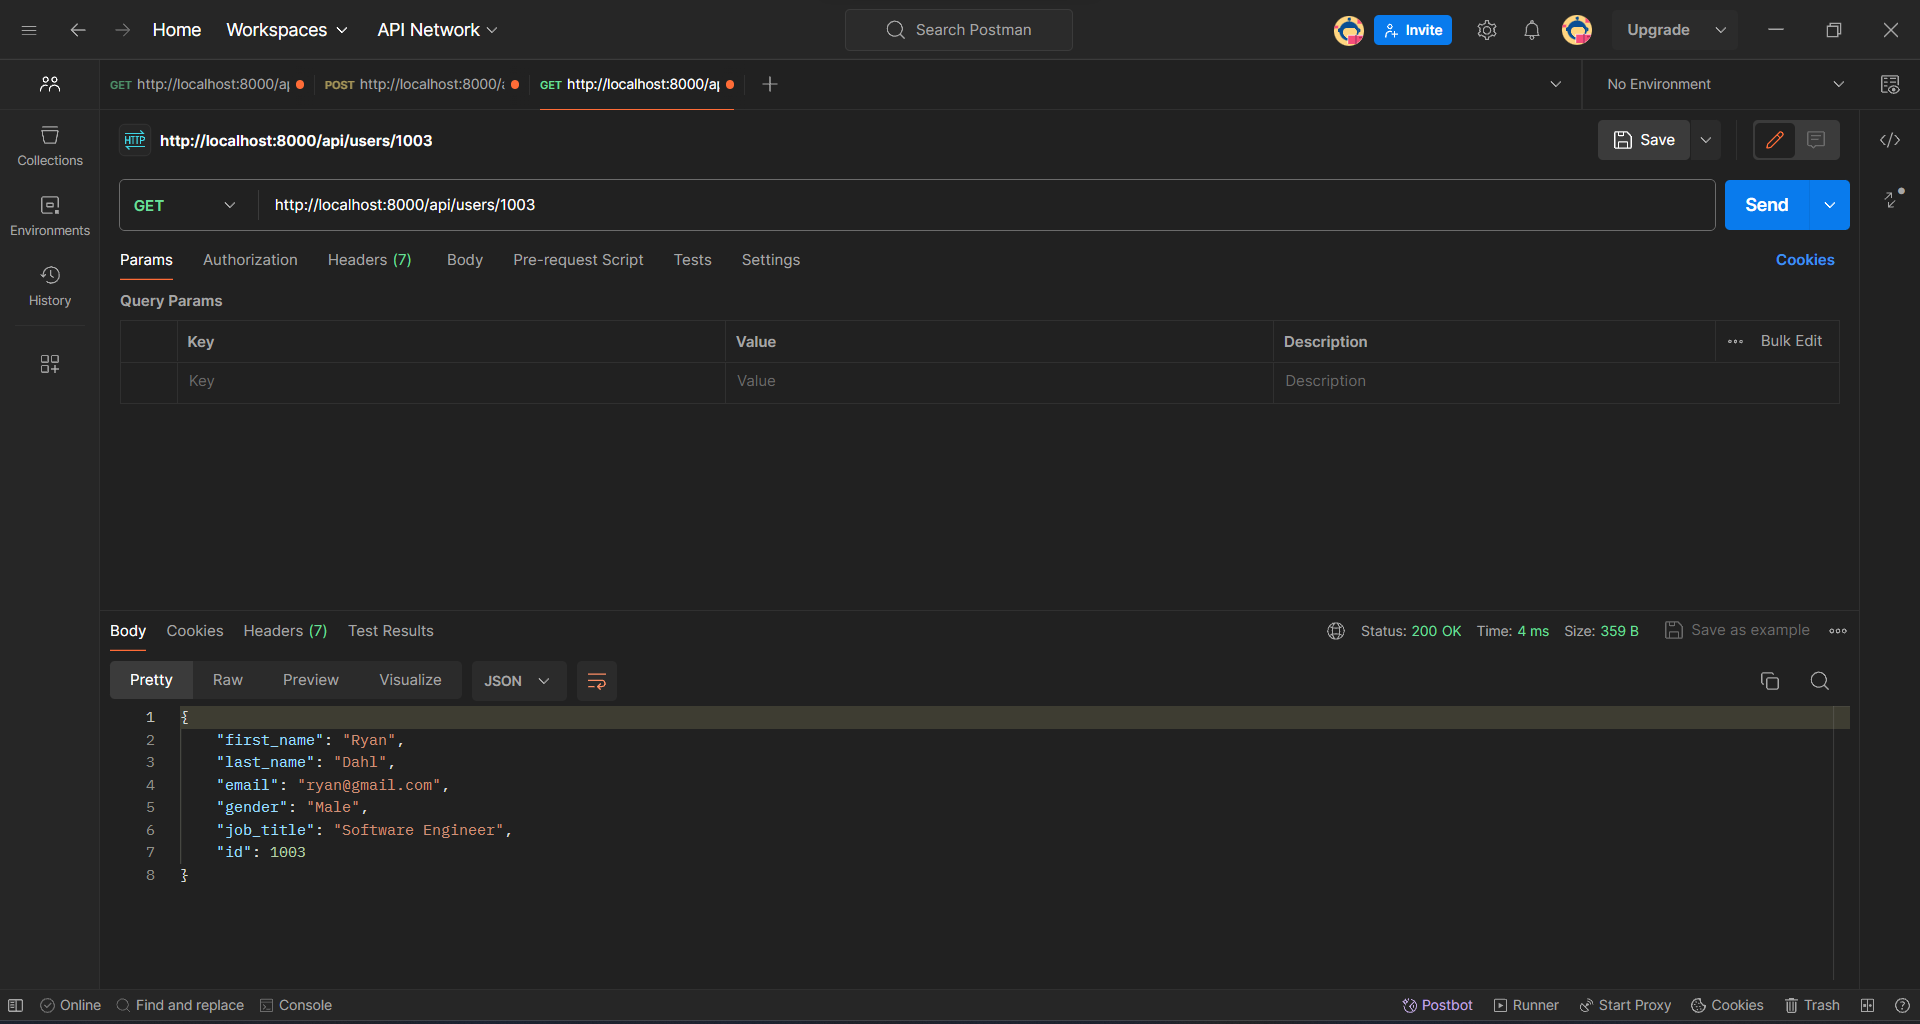
req.bodyand append it to an array of existing users. We then write the updated user data back to a JSON file usingfs.writeFile().Check if my last entry is shown or not using a GET request. URL: http://localhost:8000/api/users/1003
Handling PATCH Requests
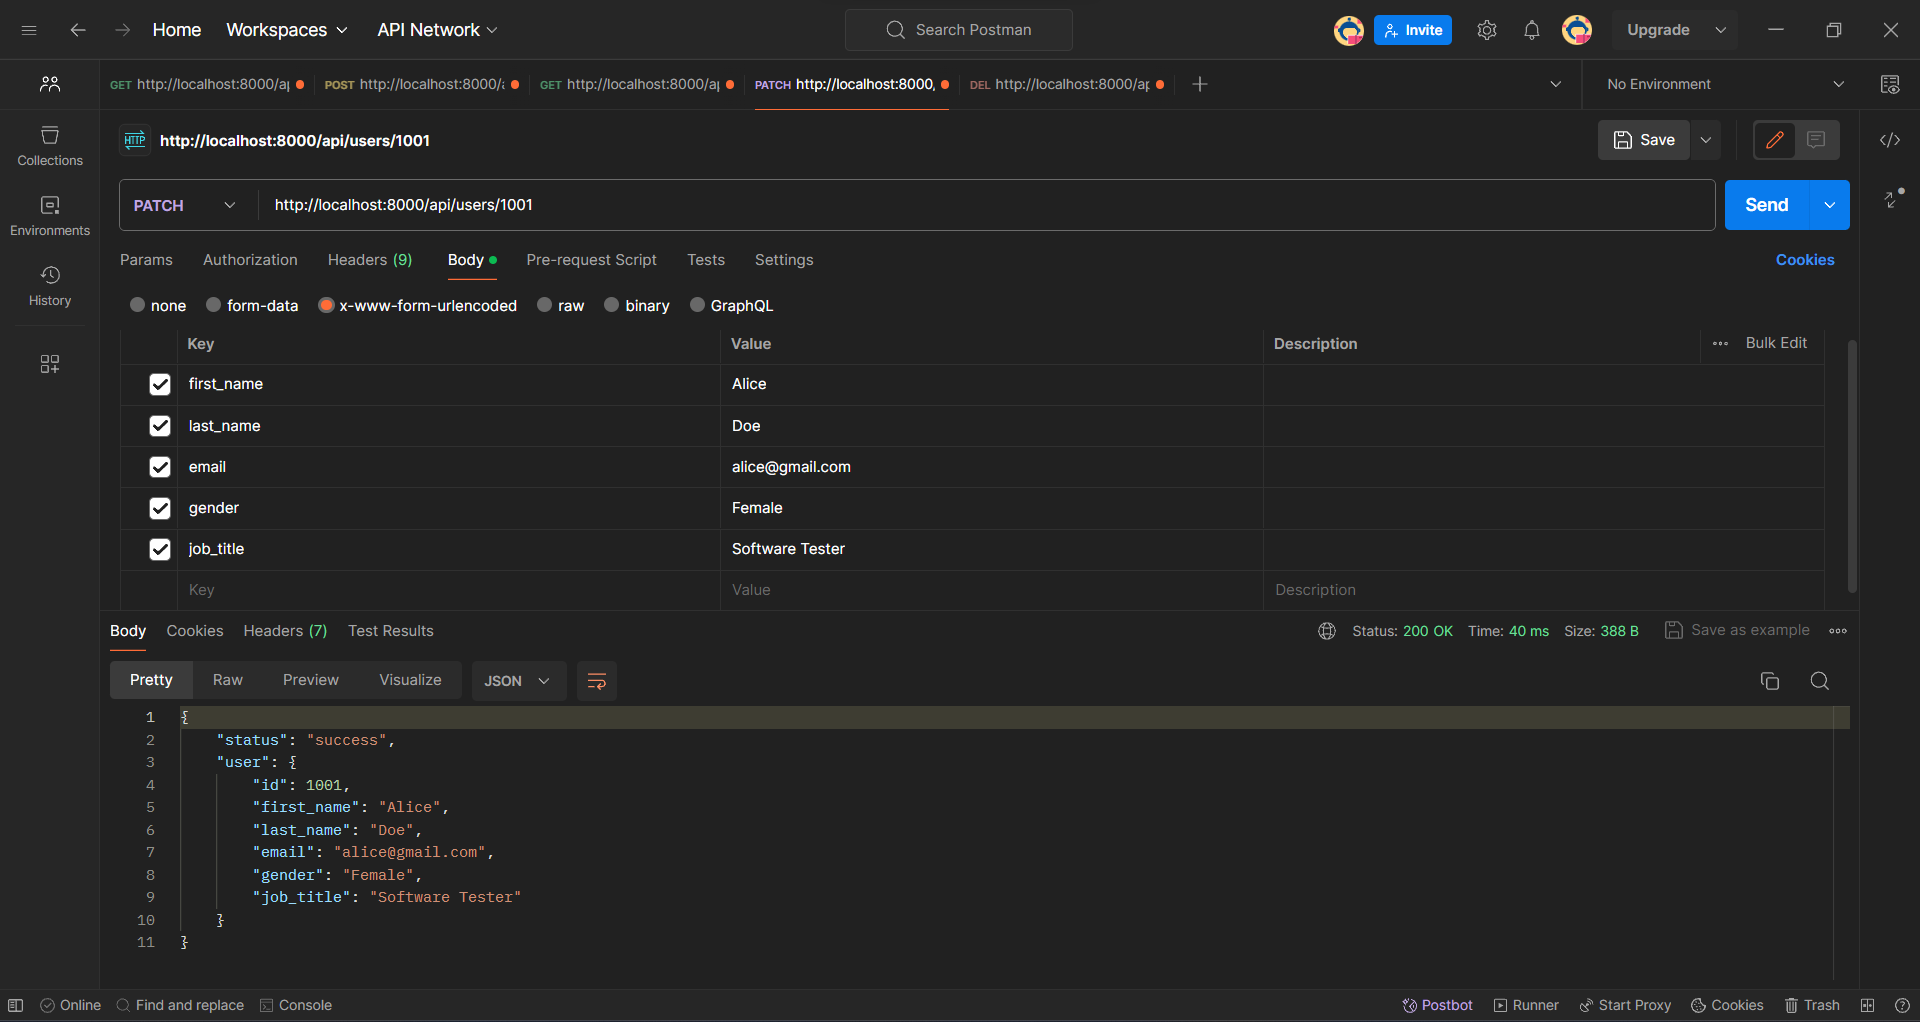
We extract the user ID from the URL parameter
req.params.idand the updated user data from the request bodyreq.body.We find the user in the
usersarray based on the extracted user ID.If the user with the specified ID is not found, we return a 404 error response.
We update the user data using
Object.assign()with the new values from the request body.Finally, we write the updated user data back to the JSON file and return a success response with the updated user data.
  // PATCH Method to update a user by ID
  app.patch('/api/users/:id', (req, res) => {
    // Extract user ID from URL parameter
    const userId = parseInt(req.params.id);
    // Extract updated user data from request body
    const newData = req.body;

    // Find the user with the specified ID
    const userToUpdate = users.find(user => user.id === userId);

    // If user with the specified ID is not found, return an error response
    if (!userToUpdate) {
      return res.status(404).json({ error: 'User not found' });
    }

    // Update the user data with the new values
    Object.assign(userToUpdate, newData);

    // Write the updated user data back to the JSON file
    fs.writeFile('./MOCK_DATA.json', JSON.stringify(users), (err) => {
      if (err) {
        return res.status(500).json({ error: 'Failed to write data to file' });
      }
      return res.json({ status: 'success', user: userToUpdate });
    });
  });
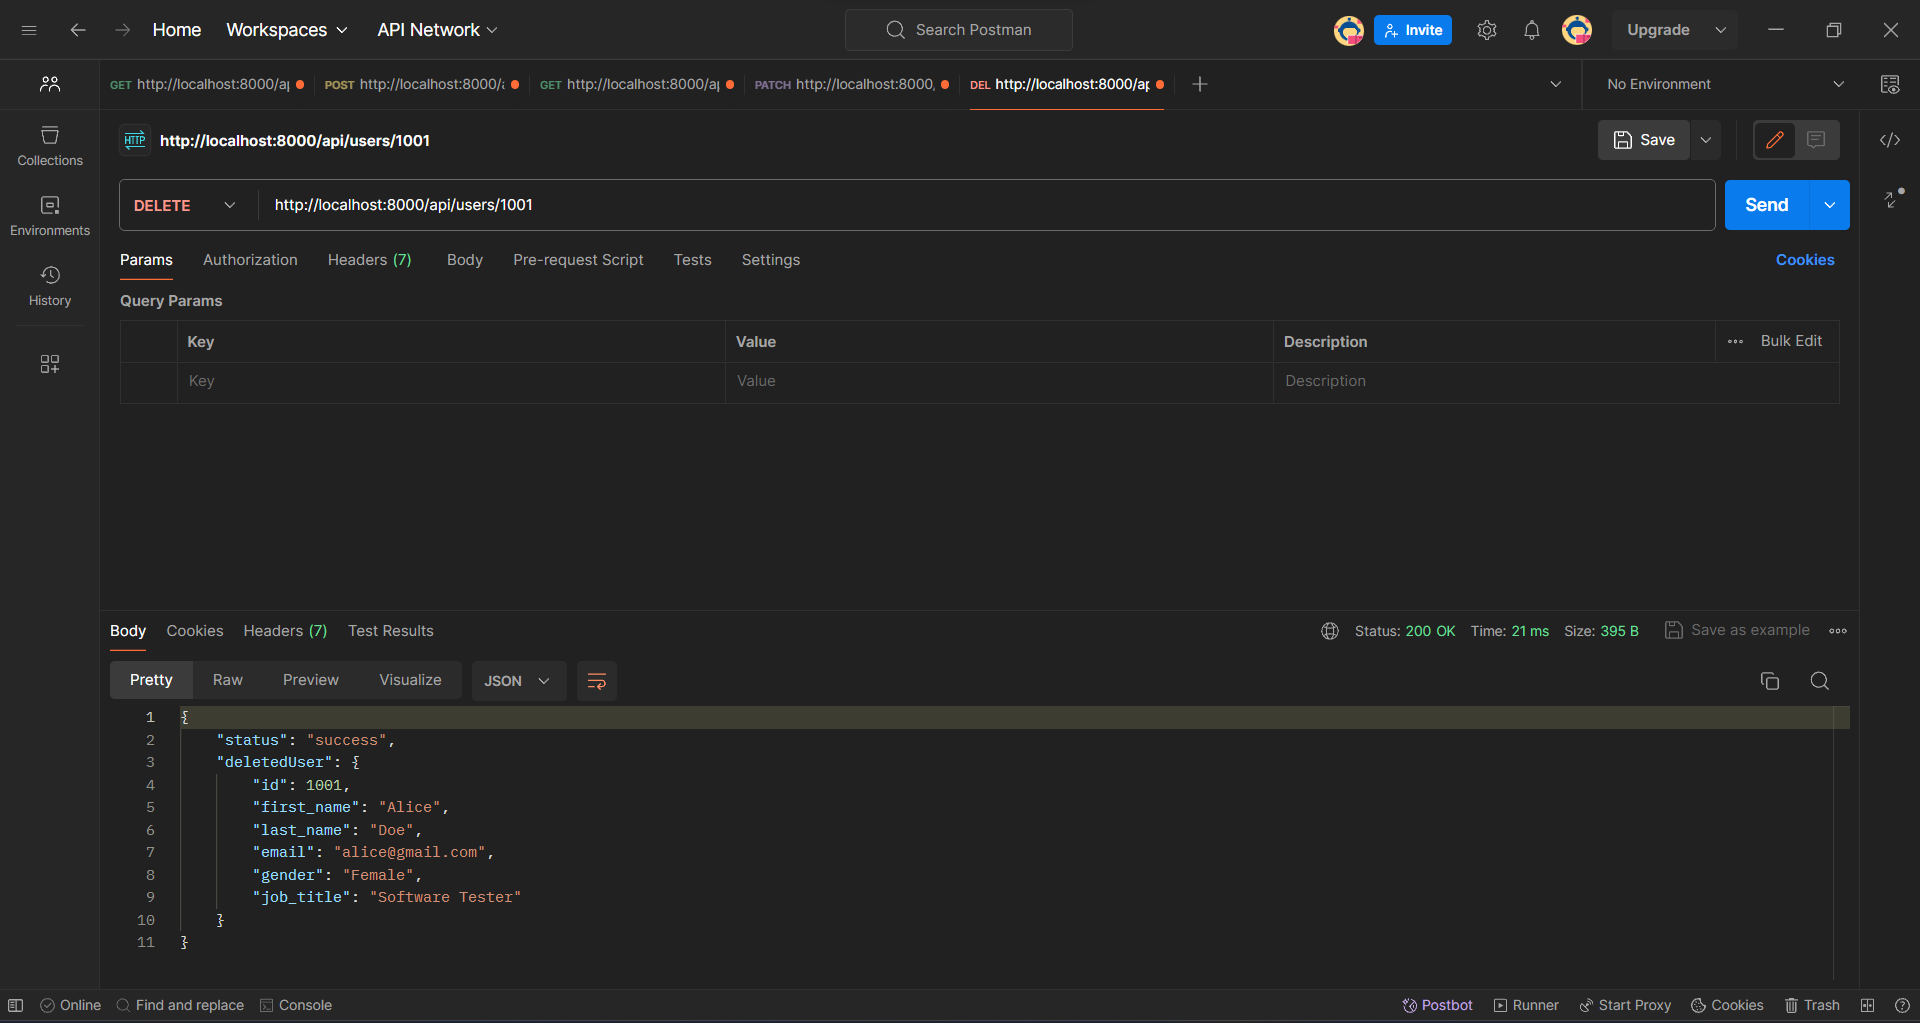
Handling DELETE Requests
We extract the user ID from the URL parameter
req.params.id.We find the index of the user in the
usersarray based on the extracted user ID using thefindIndexmethod.If the user with the specified ID is not found (i.e.,
userIndex === -1), we return a 404 error response.We remove the user from the
usersarray using thesplicemethod.Finally, we write the updated user data back to the JSON file and return a success response with the deleted user's data.
    // Delete Method
    app.delete('/api/users/:id', (req, res) => {
      // Extract user ID from URL parameter
      const userId = Number(req.params.id);

      // Find the user with the specified ID
      const userIndex = users.findIndex(user => user.id === userId);

      // If user with the specified ID is not found, return an error response
      if (!userIndex) {
        return res.status(404).json({ error: 'User not found' });
      }

      // Remove the user from the users array
      const deletedUser = users.splice(userIndex, 1)[0];
      console.log("Deleted user: ", deletedUser);

      // Adjust the indexes of the remaining users
      for(let i = userIndex; i < users.length; i++) {
        // Adjust the ID of each user
        users[i].id = i + 1;
      }

      // Write the updated user data back to the JSON file
      fs.writeFile('./MOCK_DATA.json', JSON.stringify(users), (err) => {
        if (err) {
          // If there is an error while writing to file, restore the deleted user
          users.splice(userIndex, 0, deletedUser);
          return res.status(500).json({ error: 'Failed to write data to file' });
        }
        return res.json({ status: 'success', deletedUser });
      });
    });
Note: In production-grade projects, minimizing response time is crucial. The longer it takes for a request to complete, the longer users have to wait.
Express Middleware
What is Middleware
Middleware functions are special functions in Express.js that sit between the incoming request and the outgoing response. They have access to the request (req) and response (res) objects, allowing them to perform various tasks such as logging, authentication, data parsing, etc. before sending a response. Additionally, middleware functions can call the next function to pass control to the next middleware in the chain.
Middleware functions can perform the following tasks:
Execute any code.
Make changes to the request and the response objects.
End the request-response cycle.
Call the next middleware function in the stack.
If a middleware doesn't end the request-response cycle, it must call next() to move to the next middleware function. Otherwise, the request will be left hanging.
Types of Middleware
To delve into Express middleware in detail, I recommend referring to the official Express.js documentation. How to writing a middleware and how to use middleware.
Custom Middleware
Let's create our own middleware using the app.use() method.
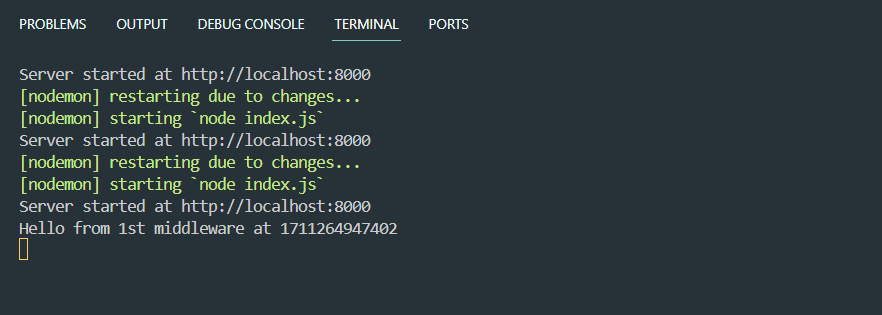
app.use((req, res, next) => {
    console.log(`Hello from 1st middleware at ${Date.now()}`);
});
The above middleware does not end the response and does not call the next one. Consequently, the response is not sent, and the process hangs.
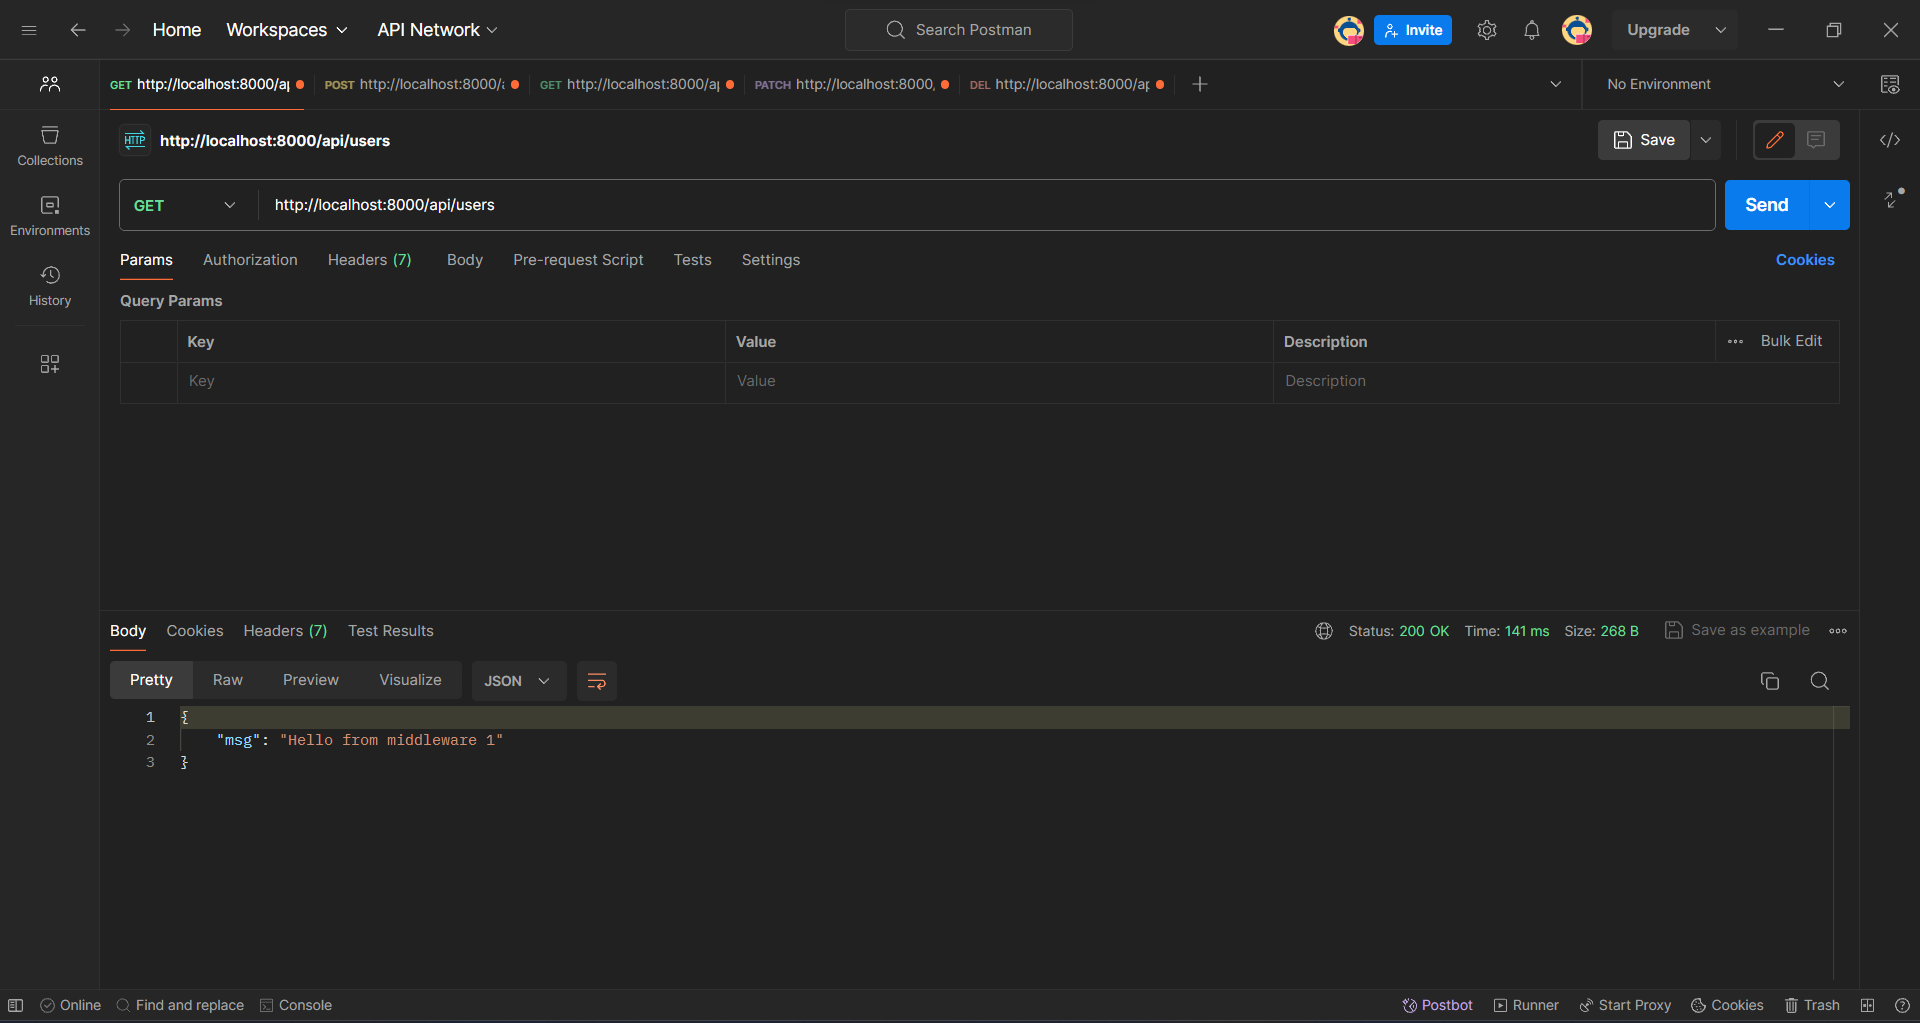
app.use((req, res, next) => {
    return res.json({msg: 'Hello from middleware 1'});
});
The code above will end the response, preventing access to the GET route.
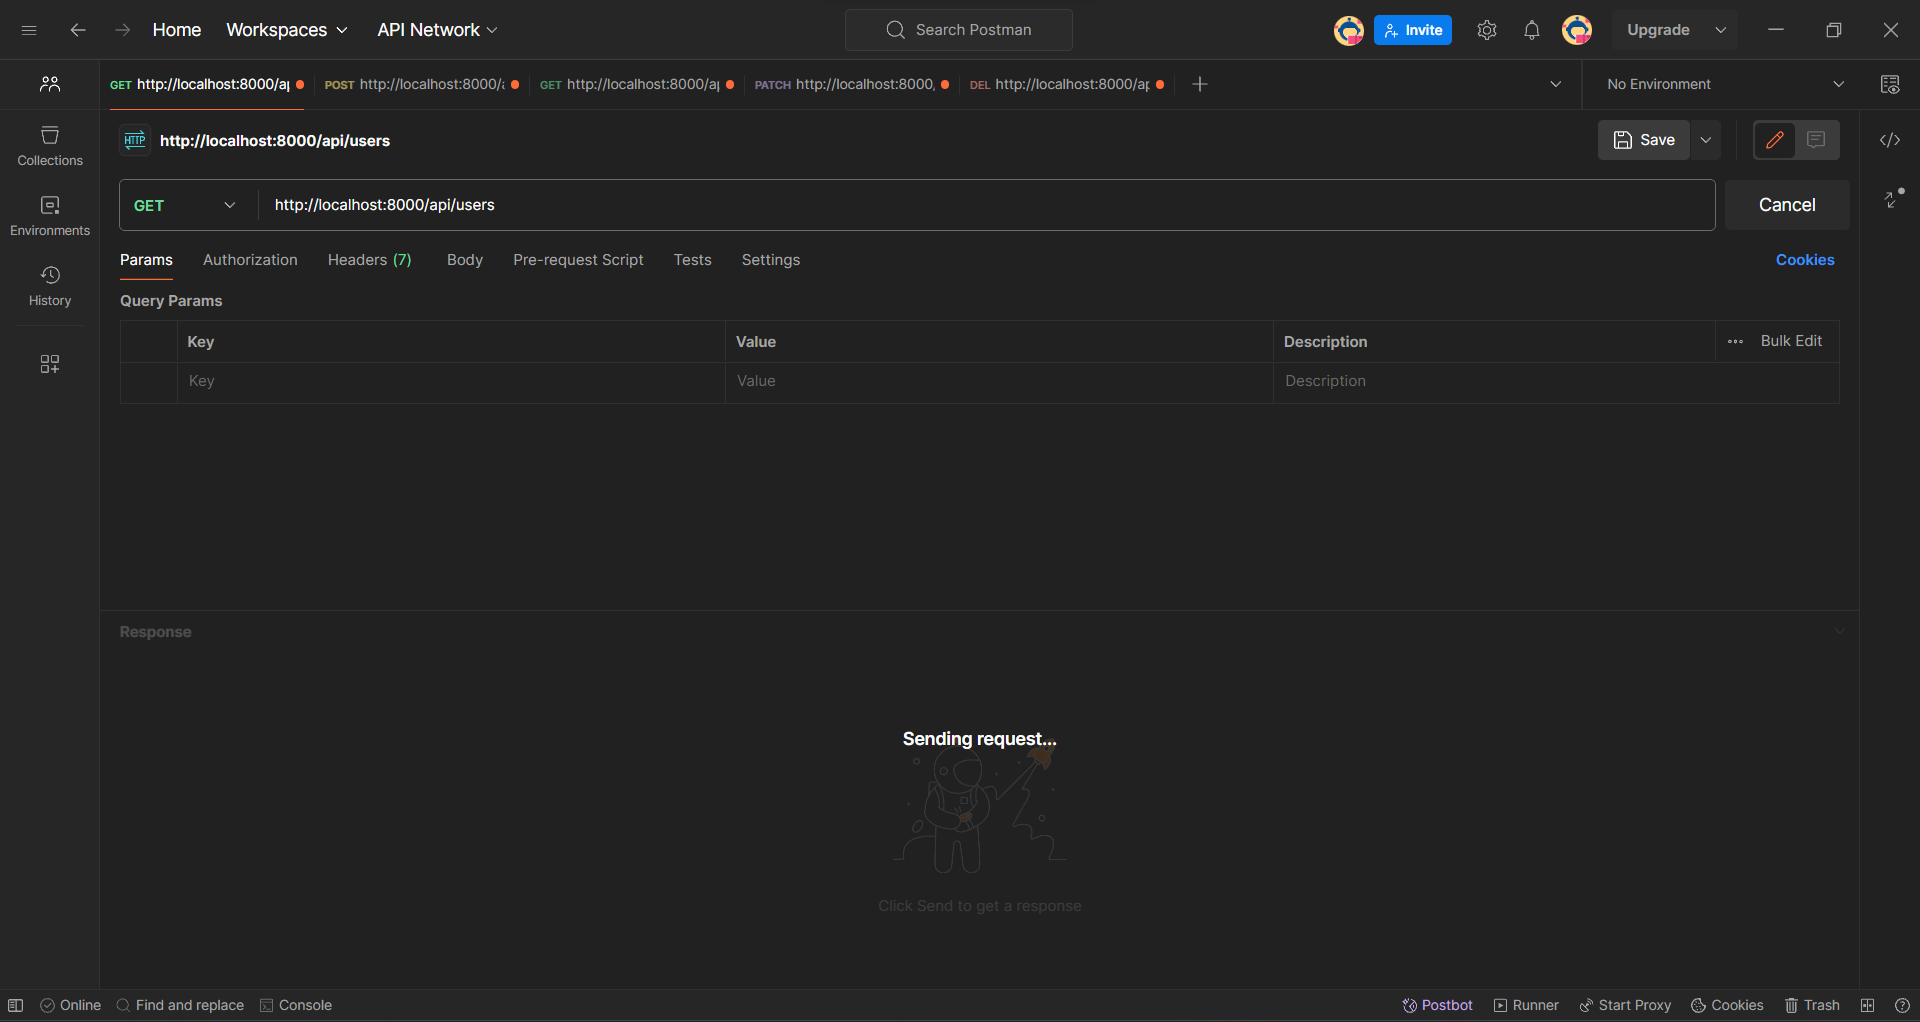
To proceed to the next middleware or route handler, call the next() function.
app.use((req, res, next) => {
    next();
});
Now, all users are served.

Multiple custom middleware
Let's create multiple middleware using the app.use() method.
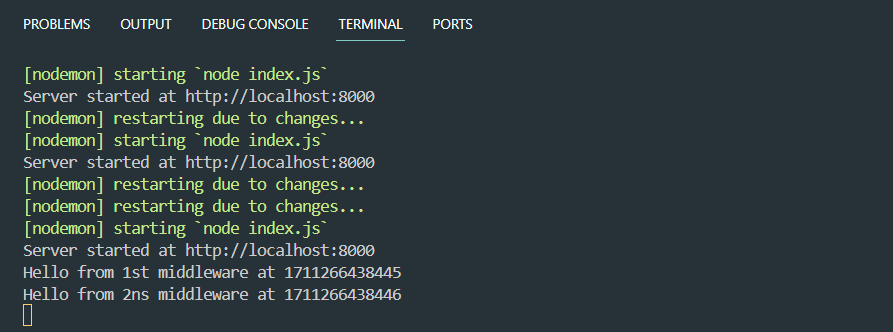
app.use((req, res, next) => {
console.log(`Hello from 1st middleware at ${Date.now()}`);
next();
});
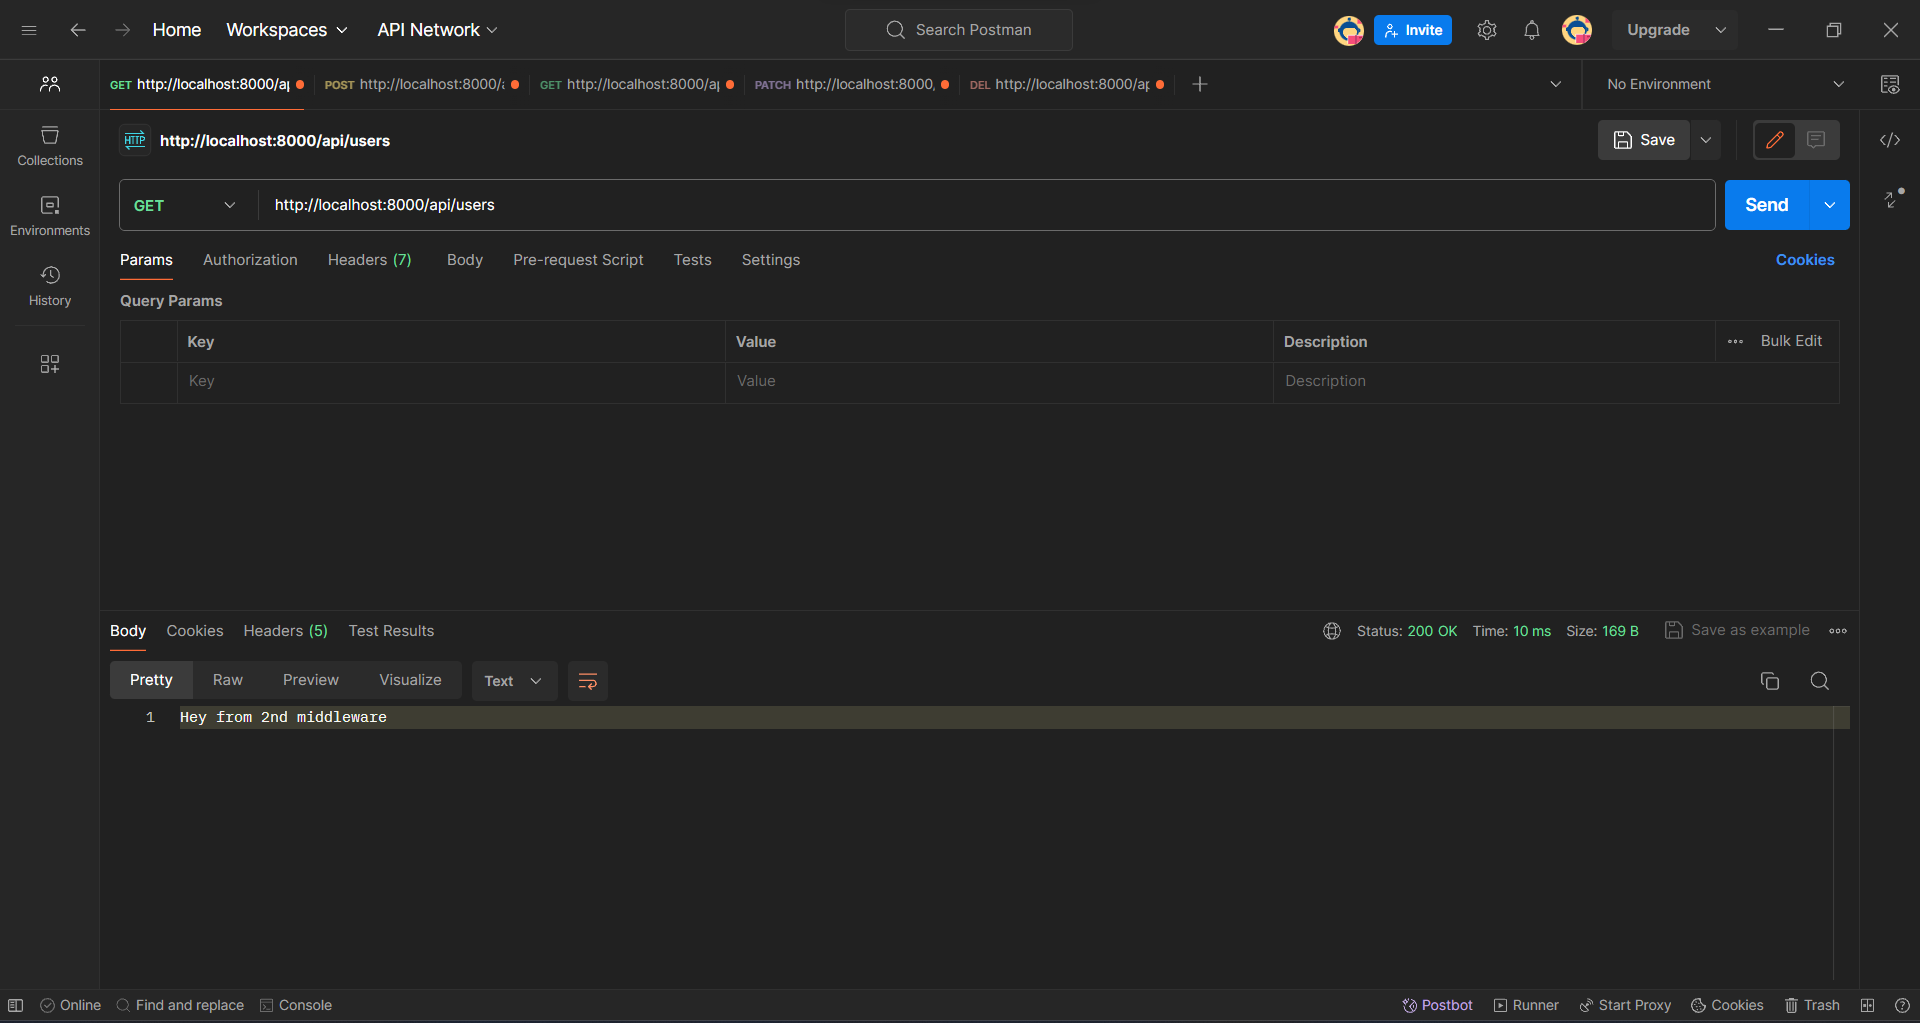
app.use((req, res, next) => {
console.log(`Hello from 2nd middleware at ${Date.now()}`);
return res.end('Hey from 2nd middleware');
});
Second middleware can end the response and not call the next() route handler. Above code returns Hey from 2nd middleware.
By calling next(), we ensure that subsequent middleware or route handlers are executed.
Second task of Middleware function
Changes can be made to the request and response objects:
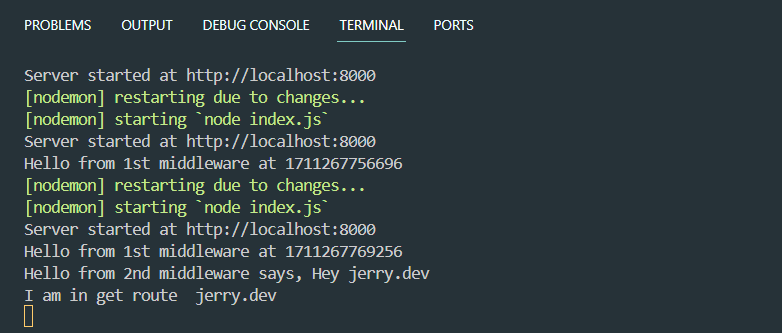
app.use((req, res, next) => {
console.log('Hello from middleware 1');
req.myUserName = 'jerry.dev';
});
app.use((req, res, next) => {
console.log('Hello from middleware 2', req.myUserName);
return res.end('Hey');
});
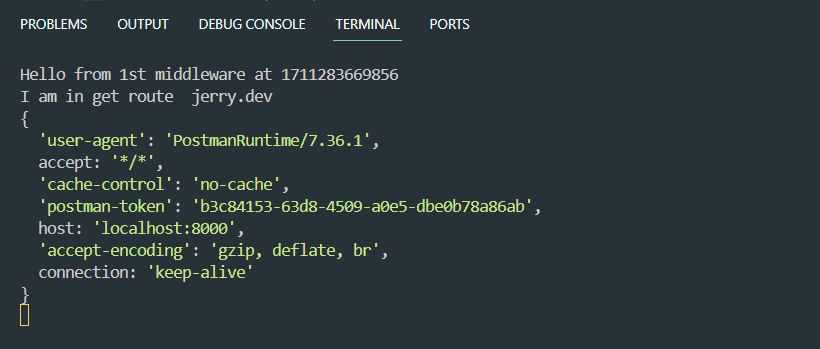
app.get('/api/users', (req, res) => {
console.log('I am in get route', req.myUserName);
return res.json(users);
});
Built-in Middleware function
app.use(express.urlencoded({ extended: false }));
The code app.use(express.urlencoded({ extended: false })) is setting up middleware in Express to parse incoming request bodies that are encoded using URL-encoded format.
express.urlencoded()is a built-in middleware function in Express.{ extended: false }is an option passed toexpress.urlencoded()indicating whether to use thequerystringlibrary (whenfalse) or theqslibrary (whentrue) to parse the URL-encoded data.
Setting it to { extended: false } means that the URL-encoded data will be parsed with the querystring library. This library does not support nested objects in the query string, resulting in a simpler parsing.
Use case of Middleware
A typical use case of middleware is creating a log.txt file for every request and response:
app.use((req, res, next) => {
    fs.appendFile('log.txt', `${Date.now()} - ${req.ip} - ${req.method} - ${req.path}\n`, (err, data) => {
        next();
    });
});
The log.txt file after performing some requests and responses.
1711268445227 - ::1 - GET - /api/users
1711268493305 - ::1 - POST - /api/users
1711268570168 - ::1 - PATCH - /api/users/1003
1711268600277 - ::1 - POST - /api/users
1711268614254 - ::1 - DELETE - /api/users/1004
HTTP Headers
What is Headers
The HTTP headers in an API request and response are crucial for transmitting metadata. They provide contextual information about the request or response body. For instance, headers can specify preferred media formats, authentication tokens, and more.
Read Headers
Let's explore how to read headers from Postman and the browser.
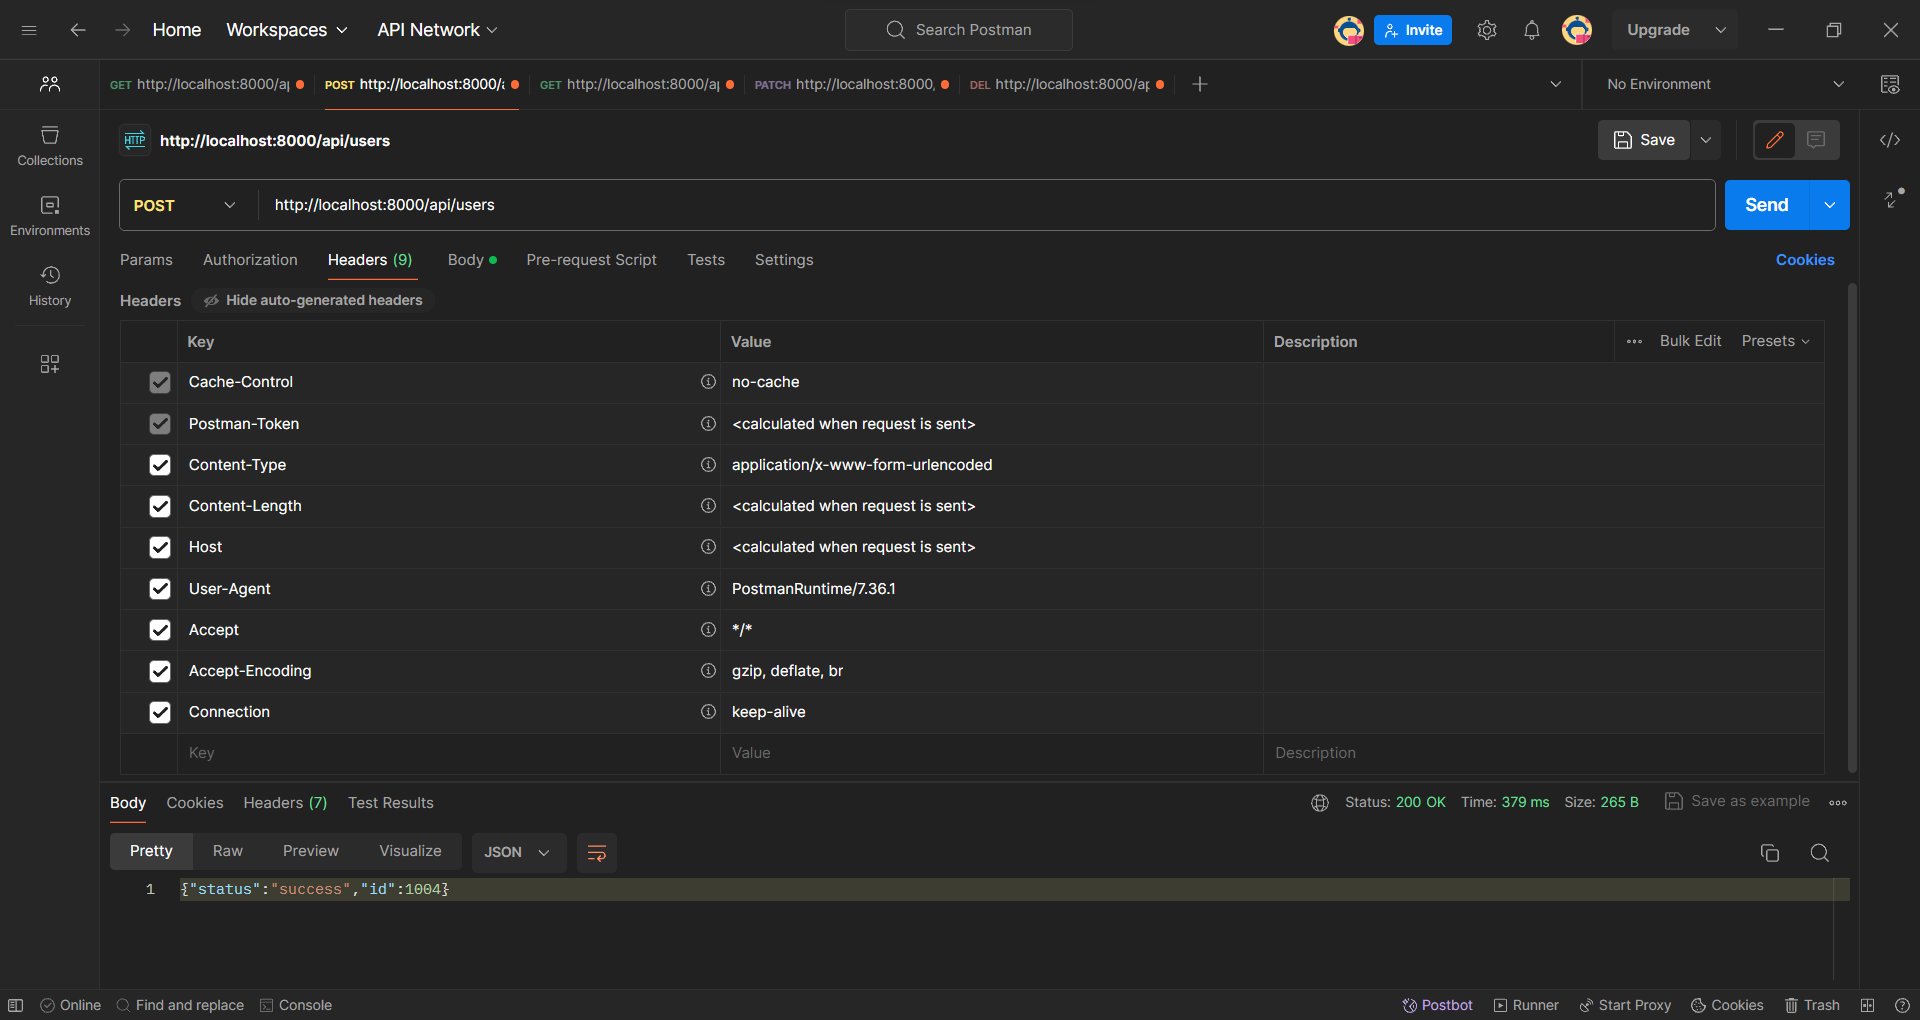
Response Header (Postman)
Request Header (Postman)
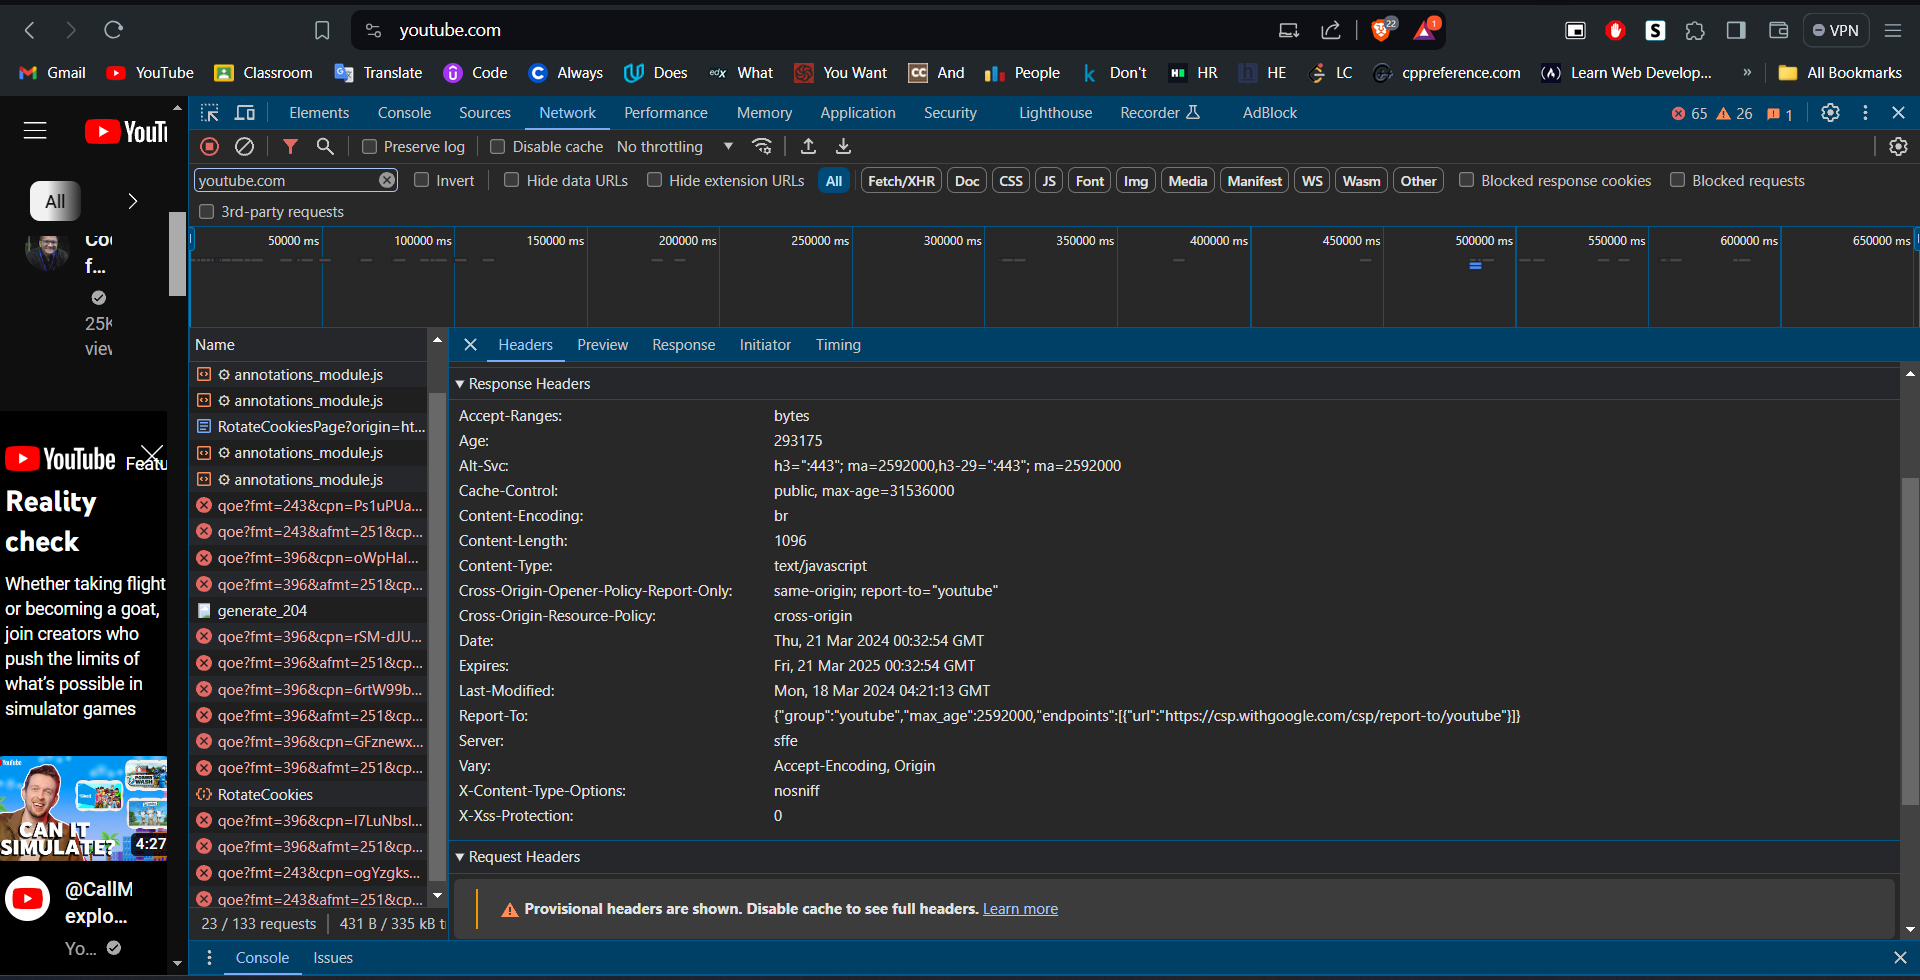
Response Header (YouTube)
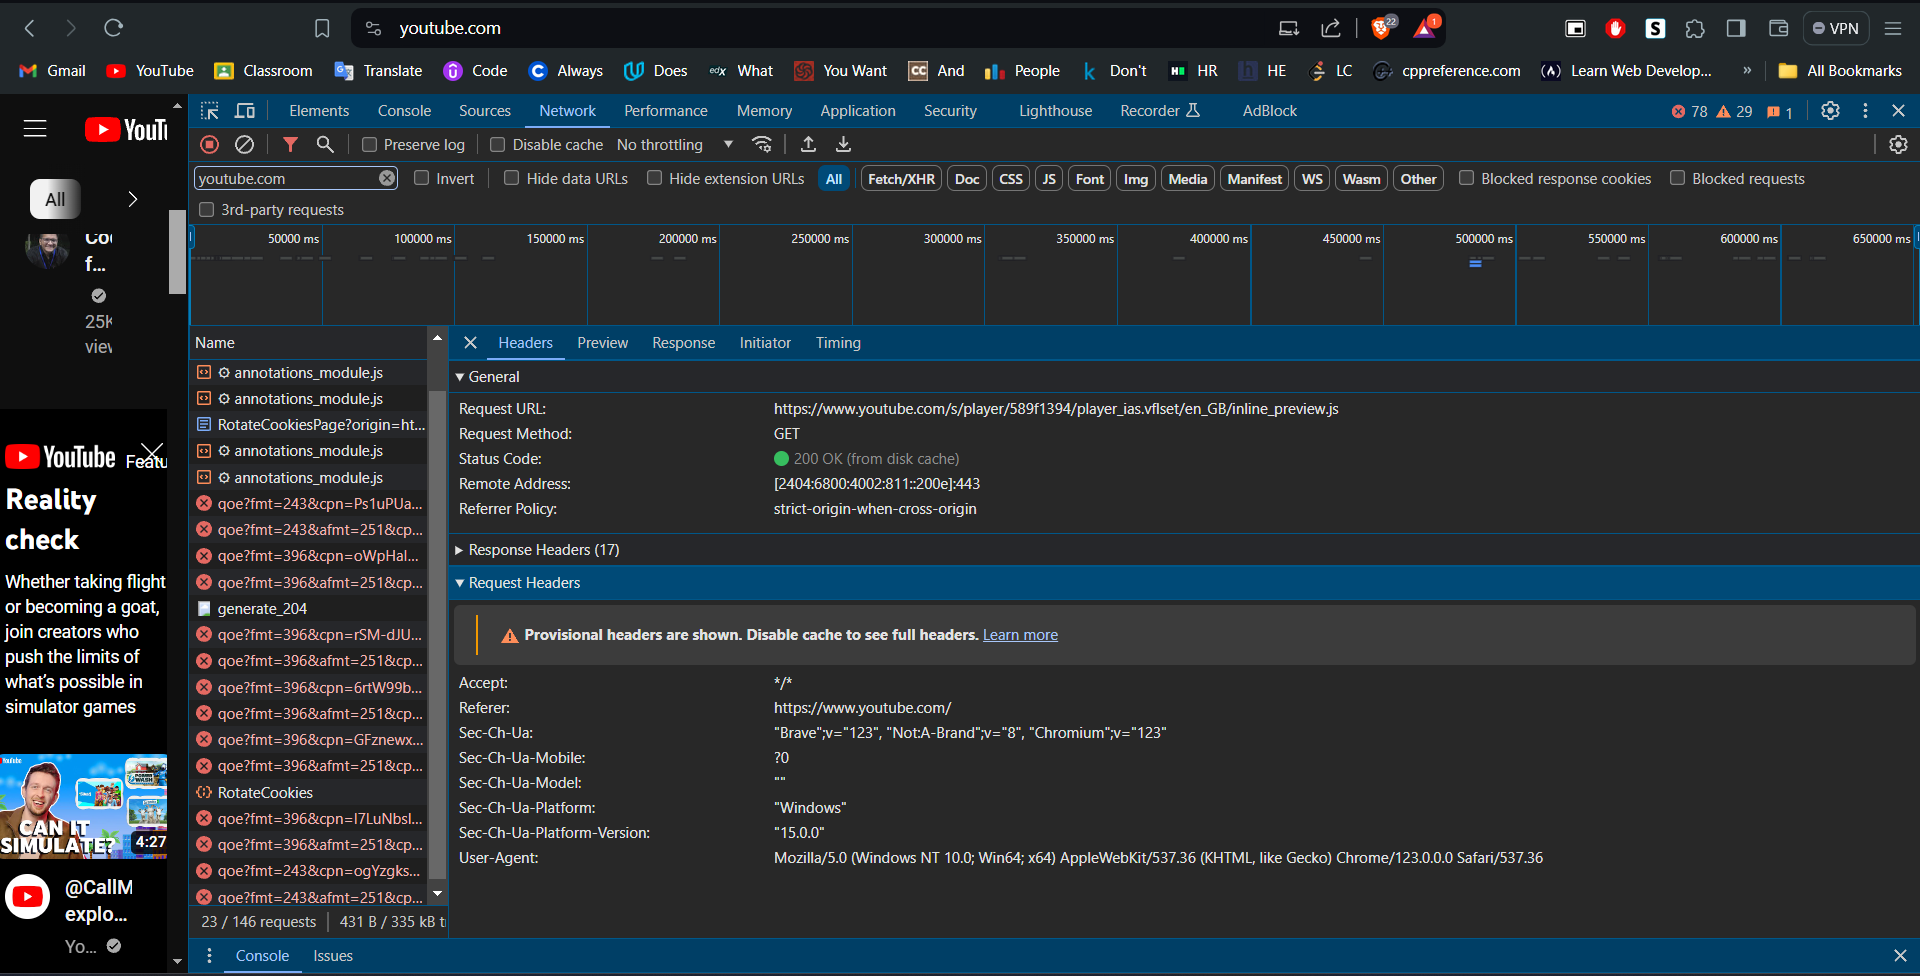
Request Header (YouTube)
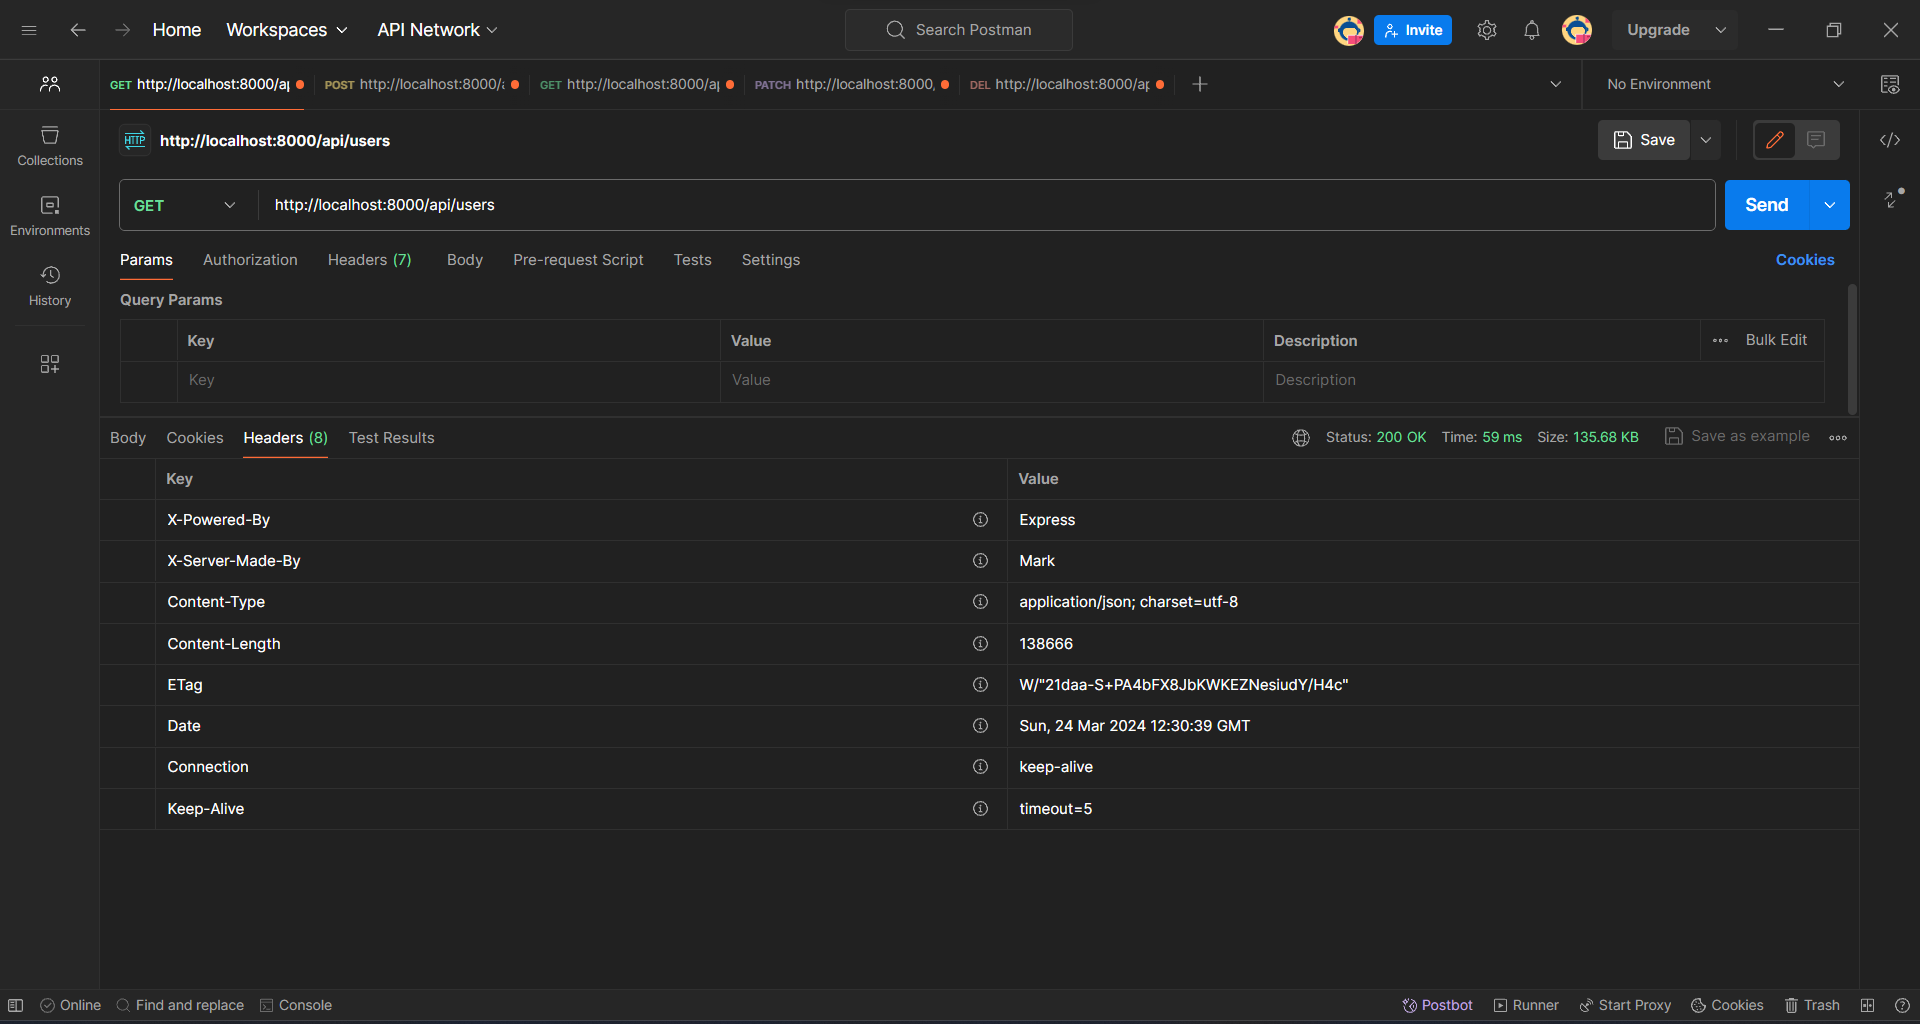
Custom Headers
Custom headers can also be created, typically prefixed with X-. It's considered a best practice to prefix custom headers with X-.
app.get('/api/user', (req, res) => {
    // View request headers
    console.log(req.headers);
    // Create a custom response header
    res.setHeader("X-Made-By", "Mark");
    return res.json(users);
});
Response Header (Postman)
Request Header (Terminal)
Built-in Headers
For further details on standard built-in headers, refer to documentation or resources like flaviocopes.com, MDN Headers, MDN HTTP Headers.
If I use
express.urlencoded(), it returns middleware that only parses urlencoded bodies and only looks at requests where the Content-Type header matches the type option. Similarly, if I useexpress.json(), it decodes JSON data from the frontend. Similarly, methods like.row(),.text(), etc., work accordingly.
HTTP Status Codes
What is HTTP Response Status Codes
HTTP response status codes are three-digit numbers returned by a server in response to a client's request. They indicate whether a specific HTTP request has been successfully completed.
Responses are grouped in five classes:
Informational responses (
100–199)Successful responses (
200–299)Redirection messages (
300–399)Client error responses (
400–499)Server error responses (
500–599)
Informational Responses
Informational responses (status codes 100-199) are used to indicate that the server has received the request and is continuing the process. These responses are interim and are usually used to inform the client that the server is still working on the request.
100 Continue: It indicates that the initial part of the request has been received and the client can proceed with sending the rest of the request, if applicable. This status code is commonly used in scenarios where the client needs to send large amounts of data in multiple parts, such as when uploading a file.
Successful Responses
Successful responses (status codes 200-299) indicate that the request was successfully received, understood, and accepted by the server. These responses signify that the server has fulfilled the client's request as expected.
200 OK: This status code indicates that the request was successful. It is the most commonly used status code for successful HTTP requests. The server has processed the request and has returned the requested resource.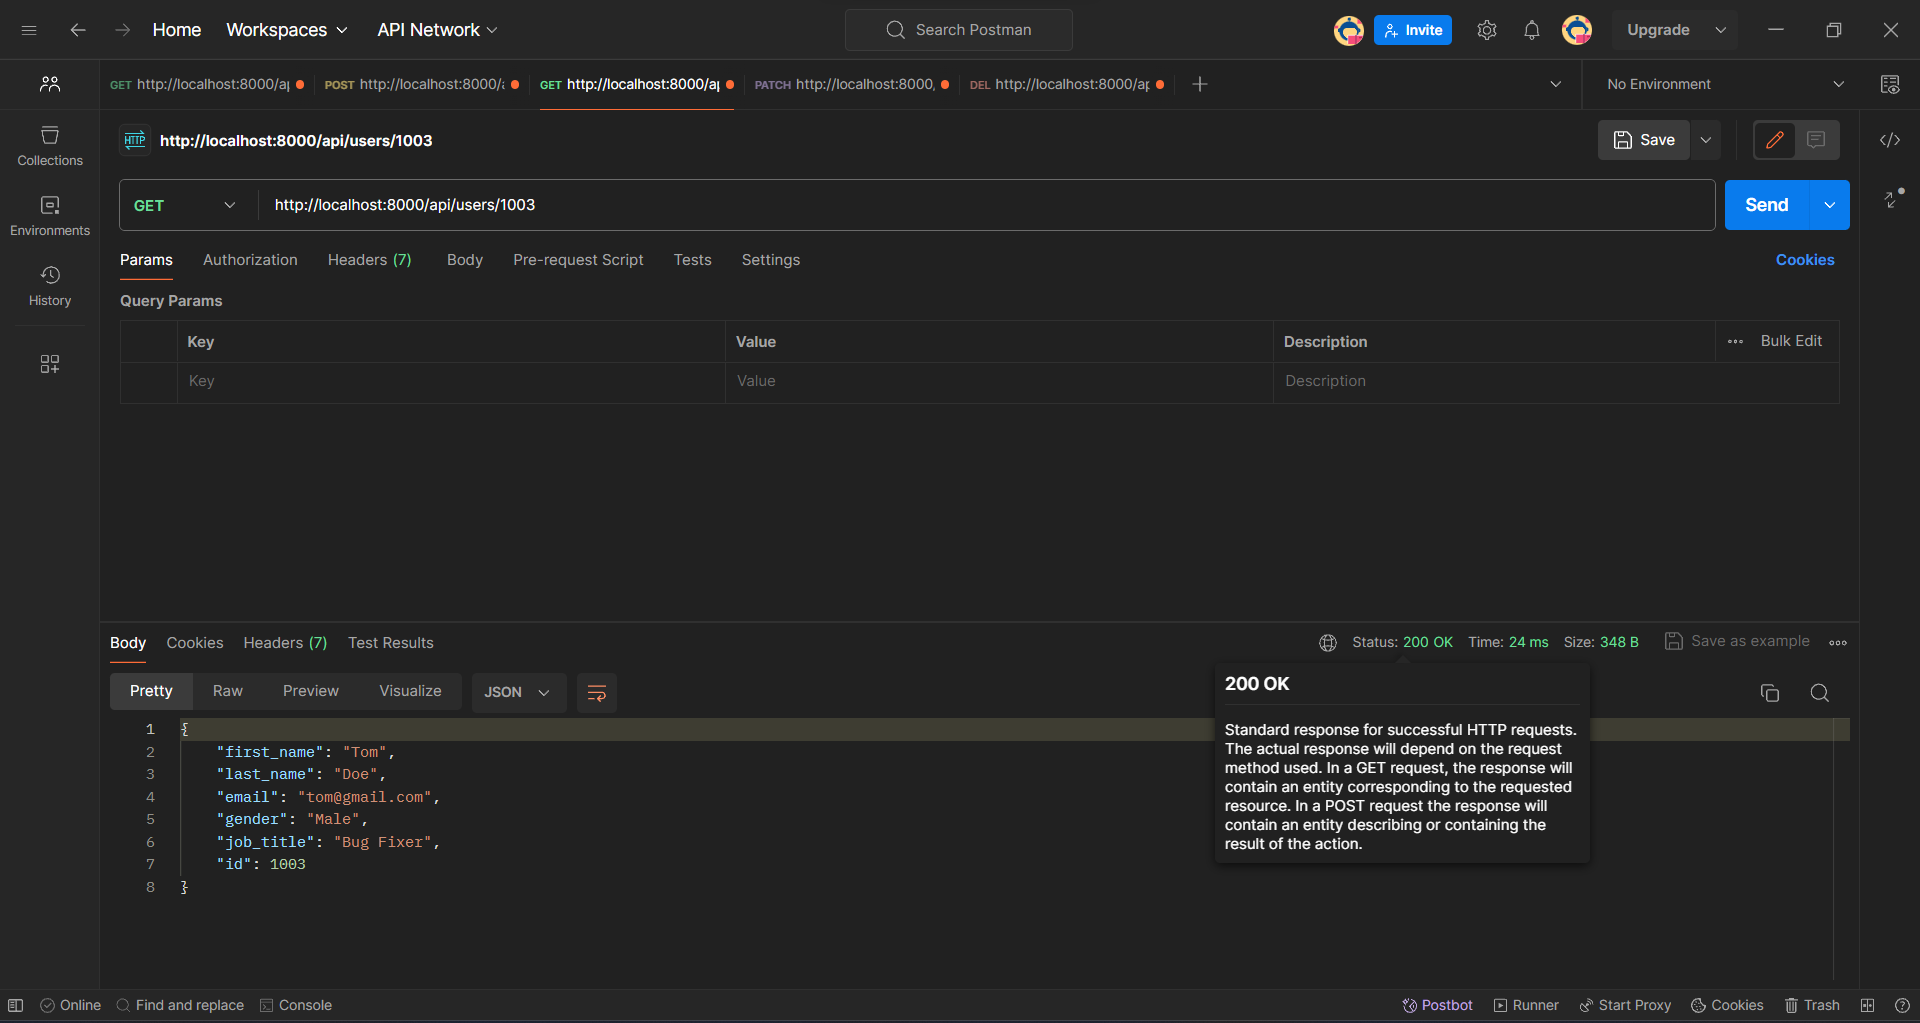
201 Created: This status code indicates that the request has been fulfilled and has resulted in the creation of a new resource. It is typically used in response to POST requests to indicate that a new resource has been successfully created on the server. The response should include a Location header that specifies the URI of the newly created resource.app.post('/api/users', (req, res) => { const body = req.body; users.push({ ...body, id: users.length + 1}); fs.writeFile('./MOCK_DATA.json', JSON.stringify(users), (err, data) => { if(err) { return res.status(500).json({error: "Failed to write data to file"}); } return res.status(201).json({status: 'success', id: users.length}); }); });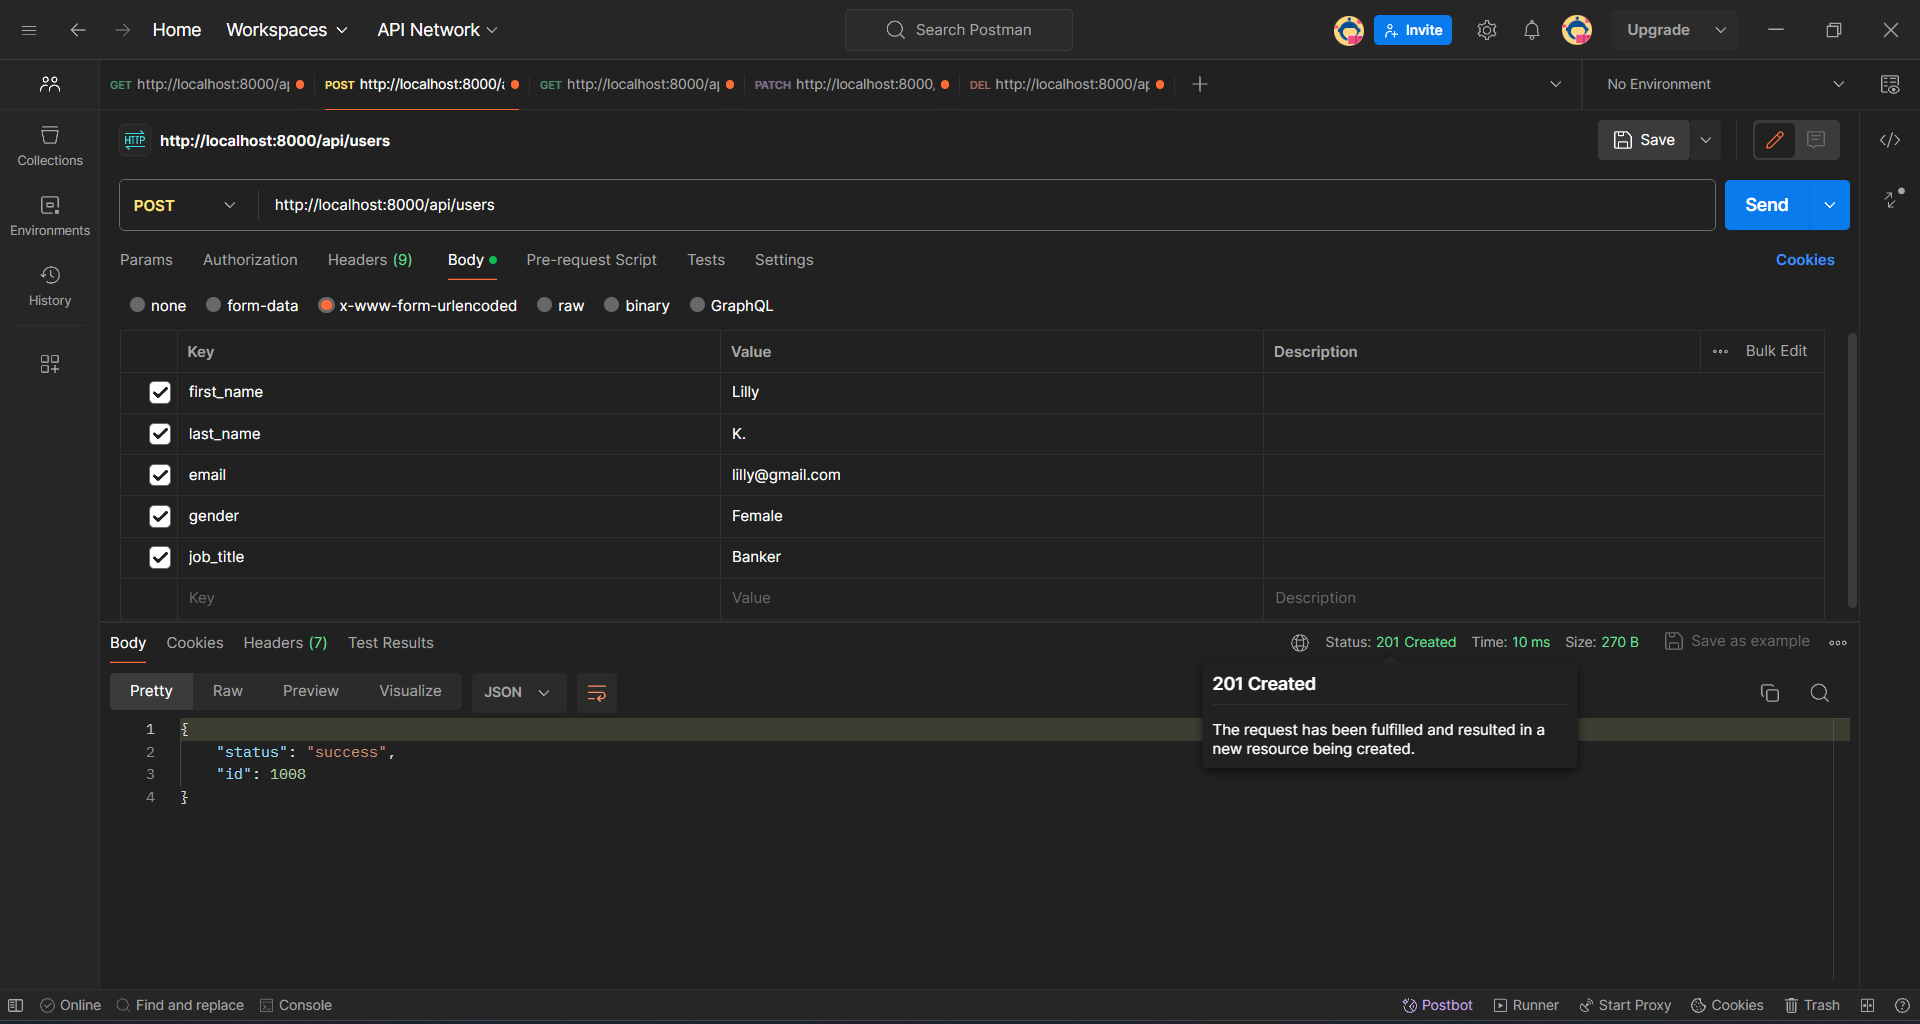
Redirection Messages
Redirection messages (status codes 300-399) indicate that further action needs to be taken by the client to complete the request. These responses typically inform the client that the requested resource has been moved or temporarily redirected to a different location.
301 Moved Permanently: This status code indicates that the requested resource has been permanently moved to a new location. Clients should update their bookmarks or links to the new URL specified in the response's Location header.302 Found (or Temporary Redirect): This status code indicates that the requested resource has been temporarily moved to a different location. Clients should continue to use the original URL for future requests, as the redirection may be temporary.
Client Error Responses
Client error responses (status codes 400-499) indicate that the server cannot process the client's request due to an error on the client side. These errors often result from malformed syntax or invalid requests made by the client.
400 Bad Request: This status code indicates that the server cannot process the client's request due to malformed syntax or other errors in the request message.app.post('/api/users', (req, res) => { const body = req.body; if(!body || !body.first_name || !body.last_name || !body.email || !body.gender || !body.job_title) { return res.status(400).json({ message: 'All fields are required'}) } users.push({ ...body, id: users.length + 1}); fs.writeFile('./MOCK_DATA.json', JSON.stringify(users), (err, data) => { if(err) { return res.status(500).json({error: "Failed to write data to file"}); } return res.status(201).json({status: 'success', id: users.length}); }); });
401 Unauthorized: This status code indicates that the client must authenticate itself to access the requested resource, but has not provided valid authentication credentials.403 Forbidden: This status code indicates that the client does not have permission to access the requested resource, even if authentication credentials are provided.404 Not Found: This status code indicates that the server cannot find the requested resource. It is commonly used when the requested URL does not correspond to any existing resource on the server.app.get('/api/users/:id', (req, res) => { const id = Number(req.params.id); const user = users.find(user => user.id === id); if(!user) return res.status(404).json({ Error : 'User not found'}) return res.json(user); });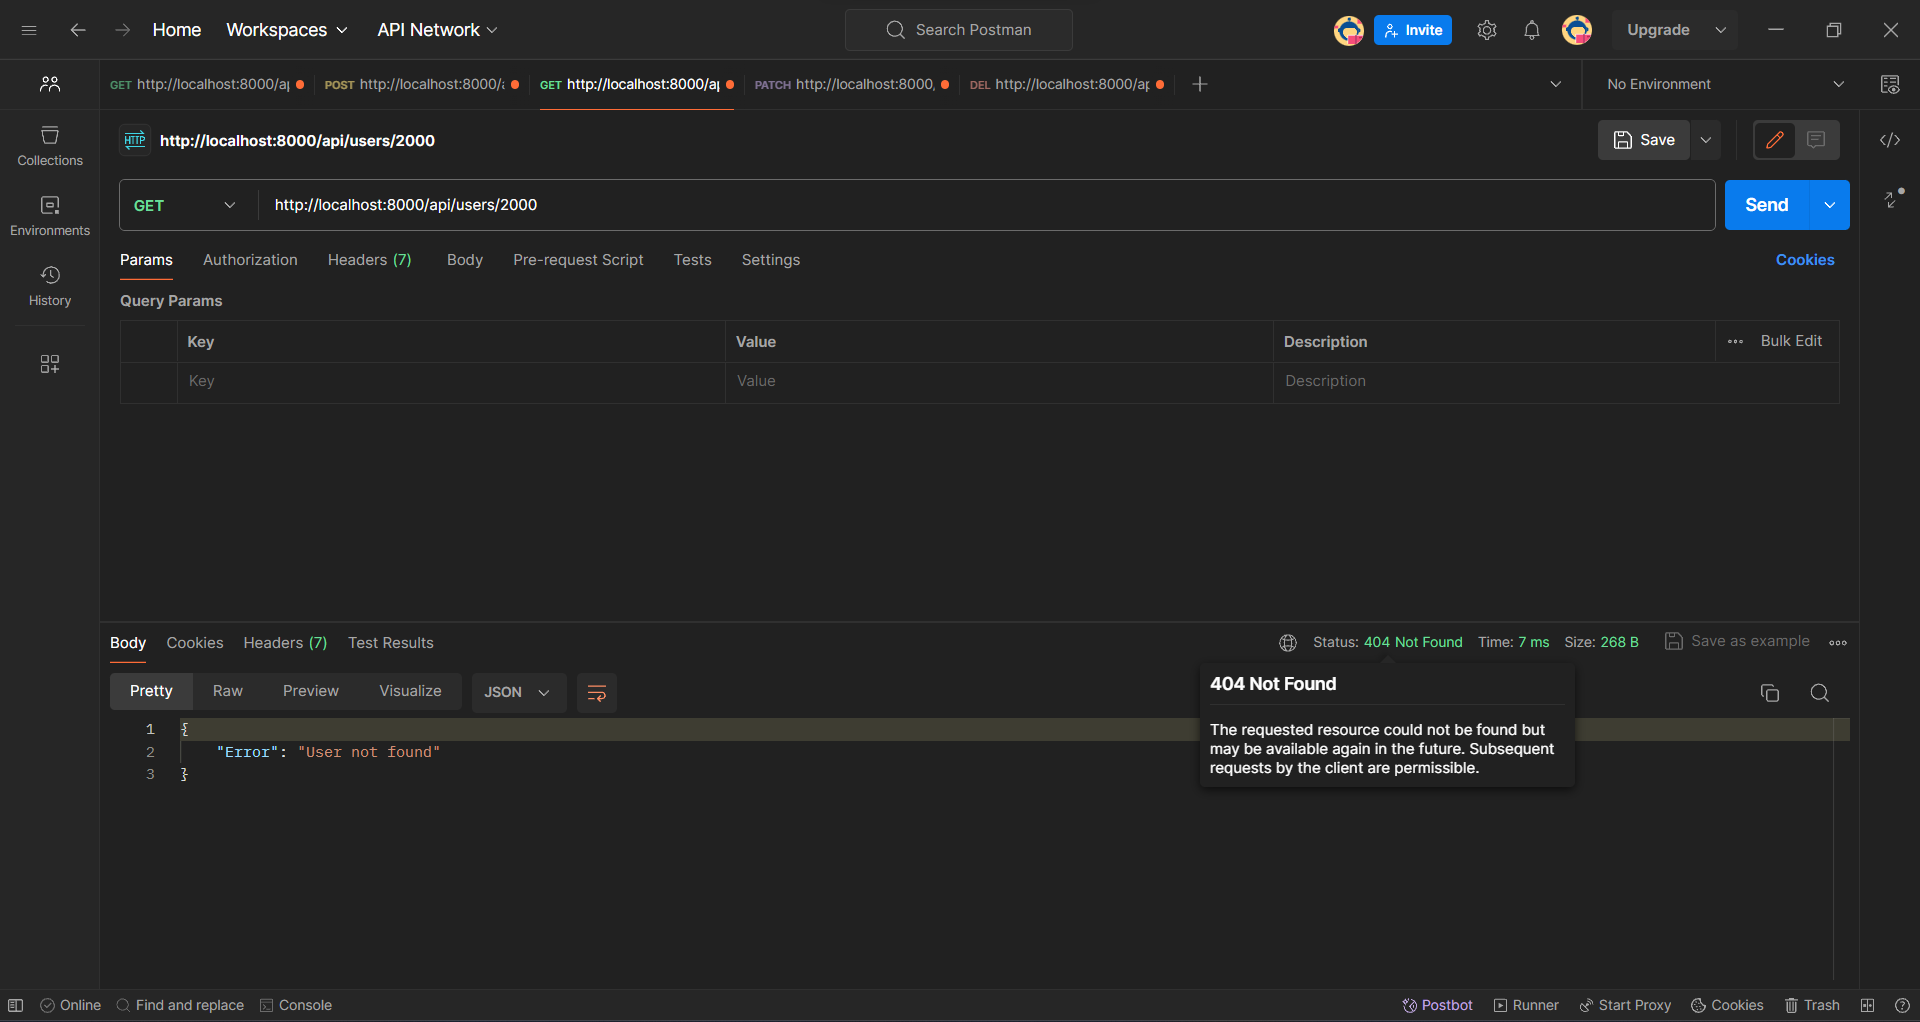

Server Error Responses
Server error responses (status codes 500-599) indicate that the server encountered an unexpected condition that prevented it from fulfilling the client's request. These errors typically originate from issues within the server itself, rather than from problems with the client's request.
500 Internal Server Error: This status code indicates that the server encountered an unexpected condition that prevented it from fulfilling the request. It is a generic error message that does not provide specific information about the nature of the problem.app.post('/api/users', (req, res) => { const body = req.body; if(!body || !body.first_name || !body.last_name || !body.email || !body.gender || !body.job_title) { return res.status(400).json({ message: 'All fields are required'}) } users.push({ ...body, id: users.length + 1}); fs.writeFile('./MOCK_DATA.json', JSON.stringify(users), (err, data) => { if(err) { return res.status(500).json({error: "Failed to write data to file"}); } return res.status(201).json({status: 'success', id: users.length}); }); });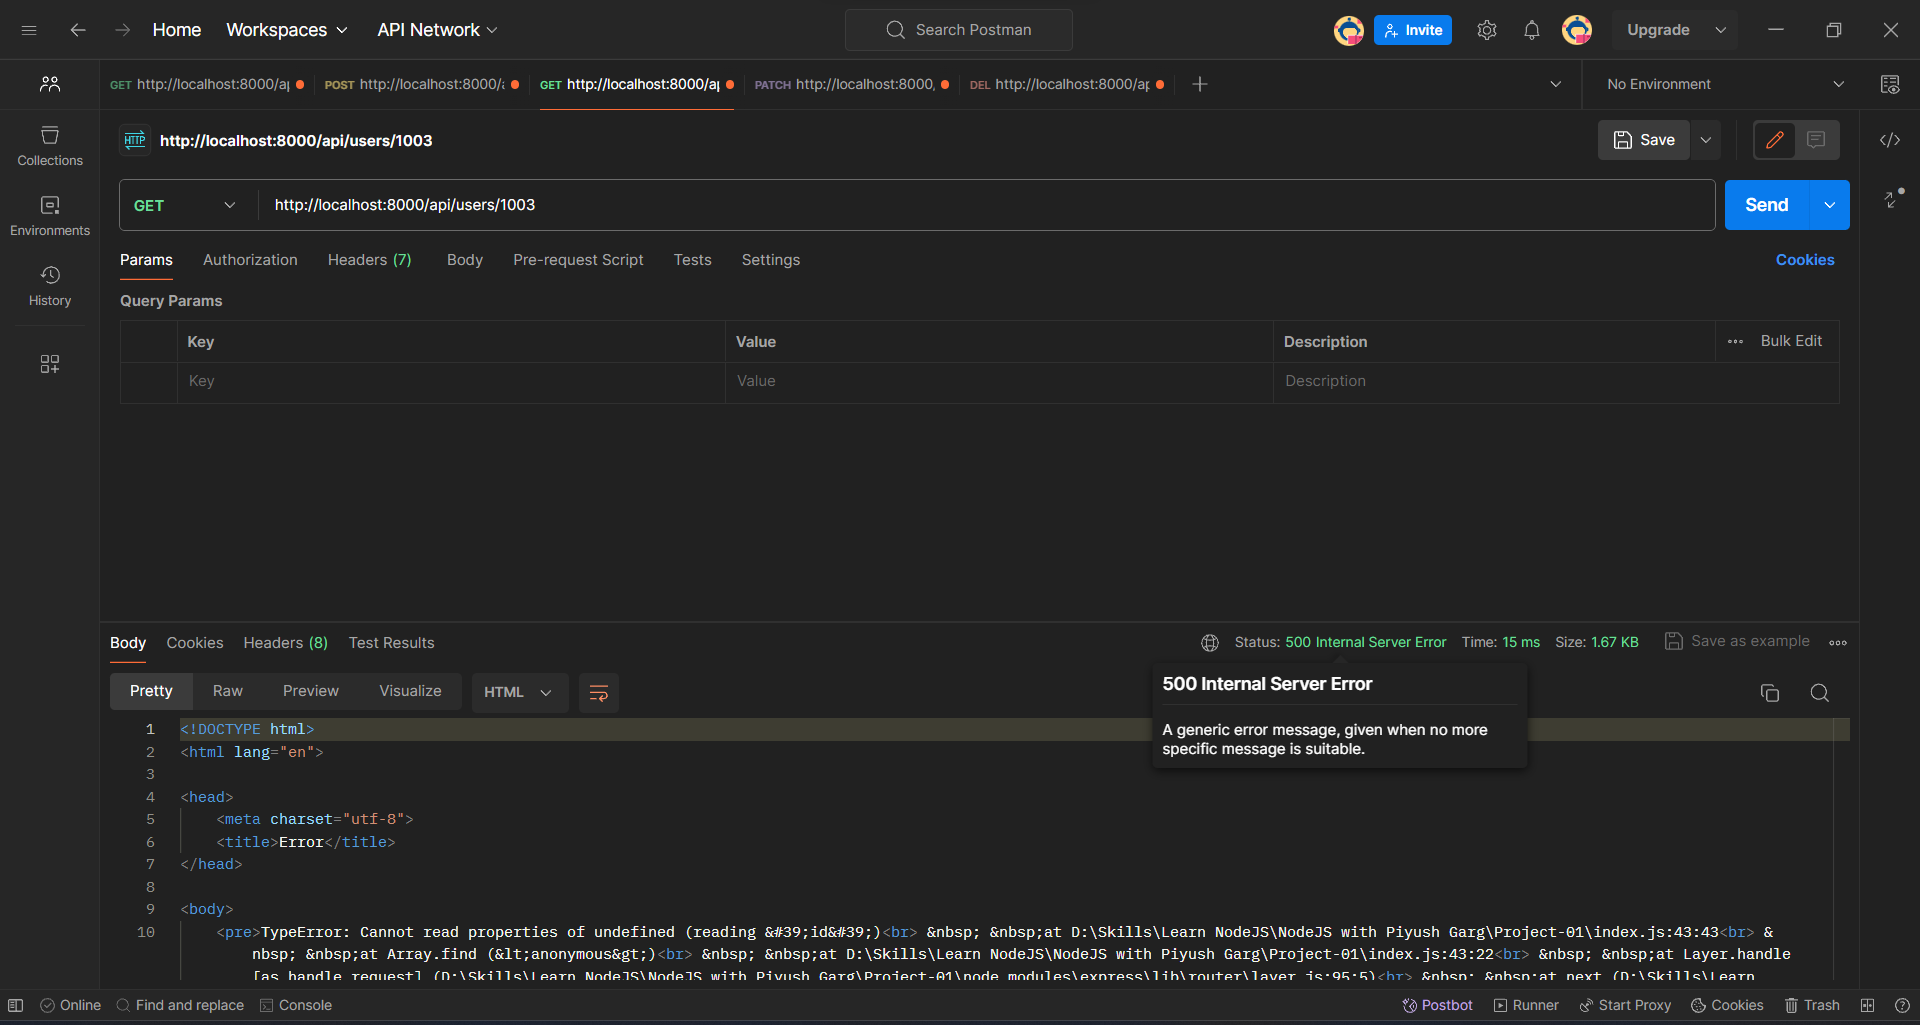
501 Not Implemented: This status code indicates that the server does not support the functionality required to fulfill the request. It is typically used when the server does not recognize the request method or cannot fulfill the request due to unimplemented features.502 Bad Gateway: This status code indicates that the server, while acting as a gateway or proxy, received an invalid response from the upstream server it accessed in attempting to fulfill the request.503 Service Unavailable: This status code indicates that the server is currently unable to handle the request due to temporary overload or maintenance of the server. It is commonly used to inform clients that the server is temporarily unavailable for servicing requests.
To learn more about HTTP Status Codes, you should refer to this document: HTTP Status Codes - MDN Web Docs


